Mandiant Advantage for Splunk
| Developed By: | Mandiant |
| Latest Versions: | 1.0.1 Mandiant Threat Intelligence support for:
1.6.1 Mandiant Advantage App for Splunk support for:
|
| Last Released: |
|
| Key Contact: | |
| Download: |
|
- Overview
- Use Cases
- Features
- Compatibility Matrix
- Prerequisites
- Get API Key ID and Secret
- Installation
- Upgrade from earlier versions
- Configure the Mandiant Advantage App For Splunk
- Saved Searches
- Lookups
- Search
- Indicator matching
- Open Source Components and Licenses
- Uninstall and Cleanup
- Troubleshooting
- Release Notes
- Upgrade Instructions
Overview
The Mandiant Advantage App for Splunk pulls threat intelligence from Google Threat Intelligence into Splunk’s powerful data platform to help you stay ahead of attackers and threats. This app provides users with a combination of Splunk Enterprise Security’s (ES) powerful analytics and massive scale along with Mandiant’s industry-leading threat intelligence, security validation, and incident response.
Use Cases
- Mandiant Advantage Threat Intelligence (MATI), coupled with Splunk Enterprise and Splunk Enterprise Security, delivers the latest threat research directly to the SOC. It lets security teams quickly detect and respond to real-time adversary activity. This information empowers organizations to better understand the adversary and their tactics so they can make informed decisions and take decisive action. Freemium intelligence feeds provide insights into well-known malicious actors and malware families, and maps to MITRE ATT&CK for strategic response.
- Security Validation (SV), coupled with Splunk Enterprise and Splunk Enterprise Security, lets customers gain confidence in their readiness to withstand cyber-attacks. SV tests the efficacy of control points to block attacks, and validates that event information is being sent to Splunk Enterprise. It also confirms that those events are triggering alerts in Splunk Enterprise Security. With Mandiant and Splunk continuously validating the effectiveness of your cybersecurity controls, you’ll have real data on how security controls are performing. Together, these solutions let you optimize your environments and make the right investments for the future.
- Attack Surface Management (ASM) enables comprehensive visibility of the extended enterprise so security teams can proactively mitigate real-world threats. ASM scans corporate assets and cloud resources daily and identifies application and service technologies. The module assesses risks to the organization, assigns severity, and provides information security teams can use within Splunk to remediate.
- Digital Threat Monitoring (DTM) is continuously discovering, ingesting, and analyzing suspicious content from both the surface and dark web. It collects content from around the internet, including paste sites (such as GitHub or Pastebin), forum posts, malicious email messages, compromised credentials data sources, and other open source threat data. Alerts are triggered and displayed in Splunk in near real-time when your specified content is detected, letting you respond quickly to mitigate any threats to your organization.
- In the face of a suspected or active breach, you can use the integration between Mandiant Incident Response, Splunk Enterprise, and Splunk Enterprise Security to engage with Mandiant Intelligence experts with the click of a button. This can help you build your incident response capabilities and respond to active breaches. It also helps to bolster your security operations to detect and respond to attacks in the future.
Features
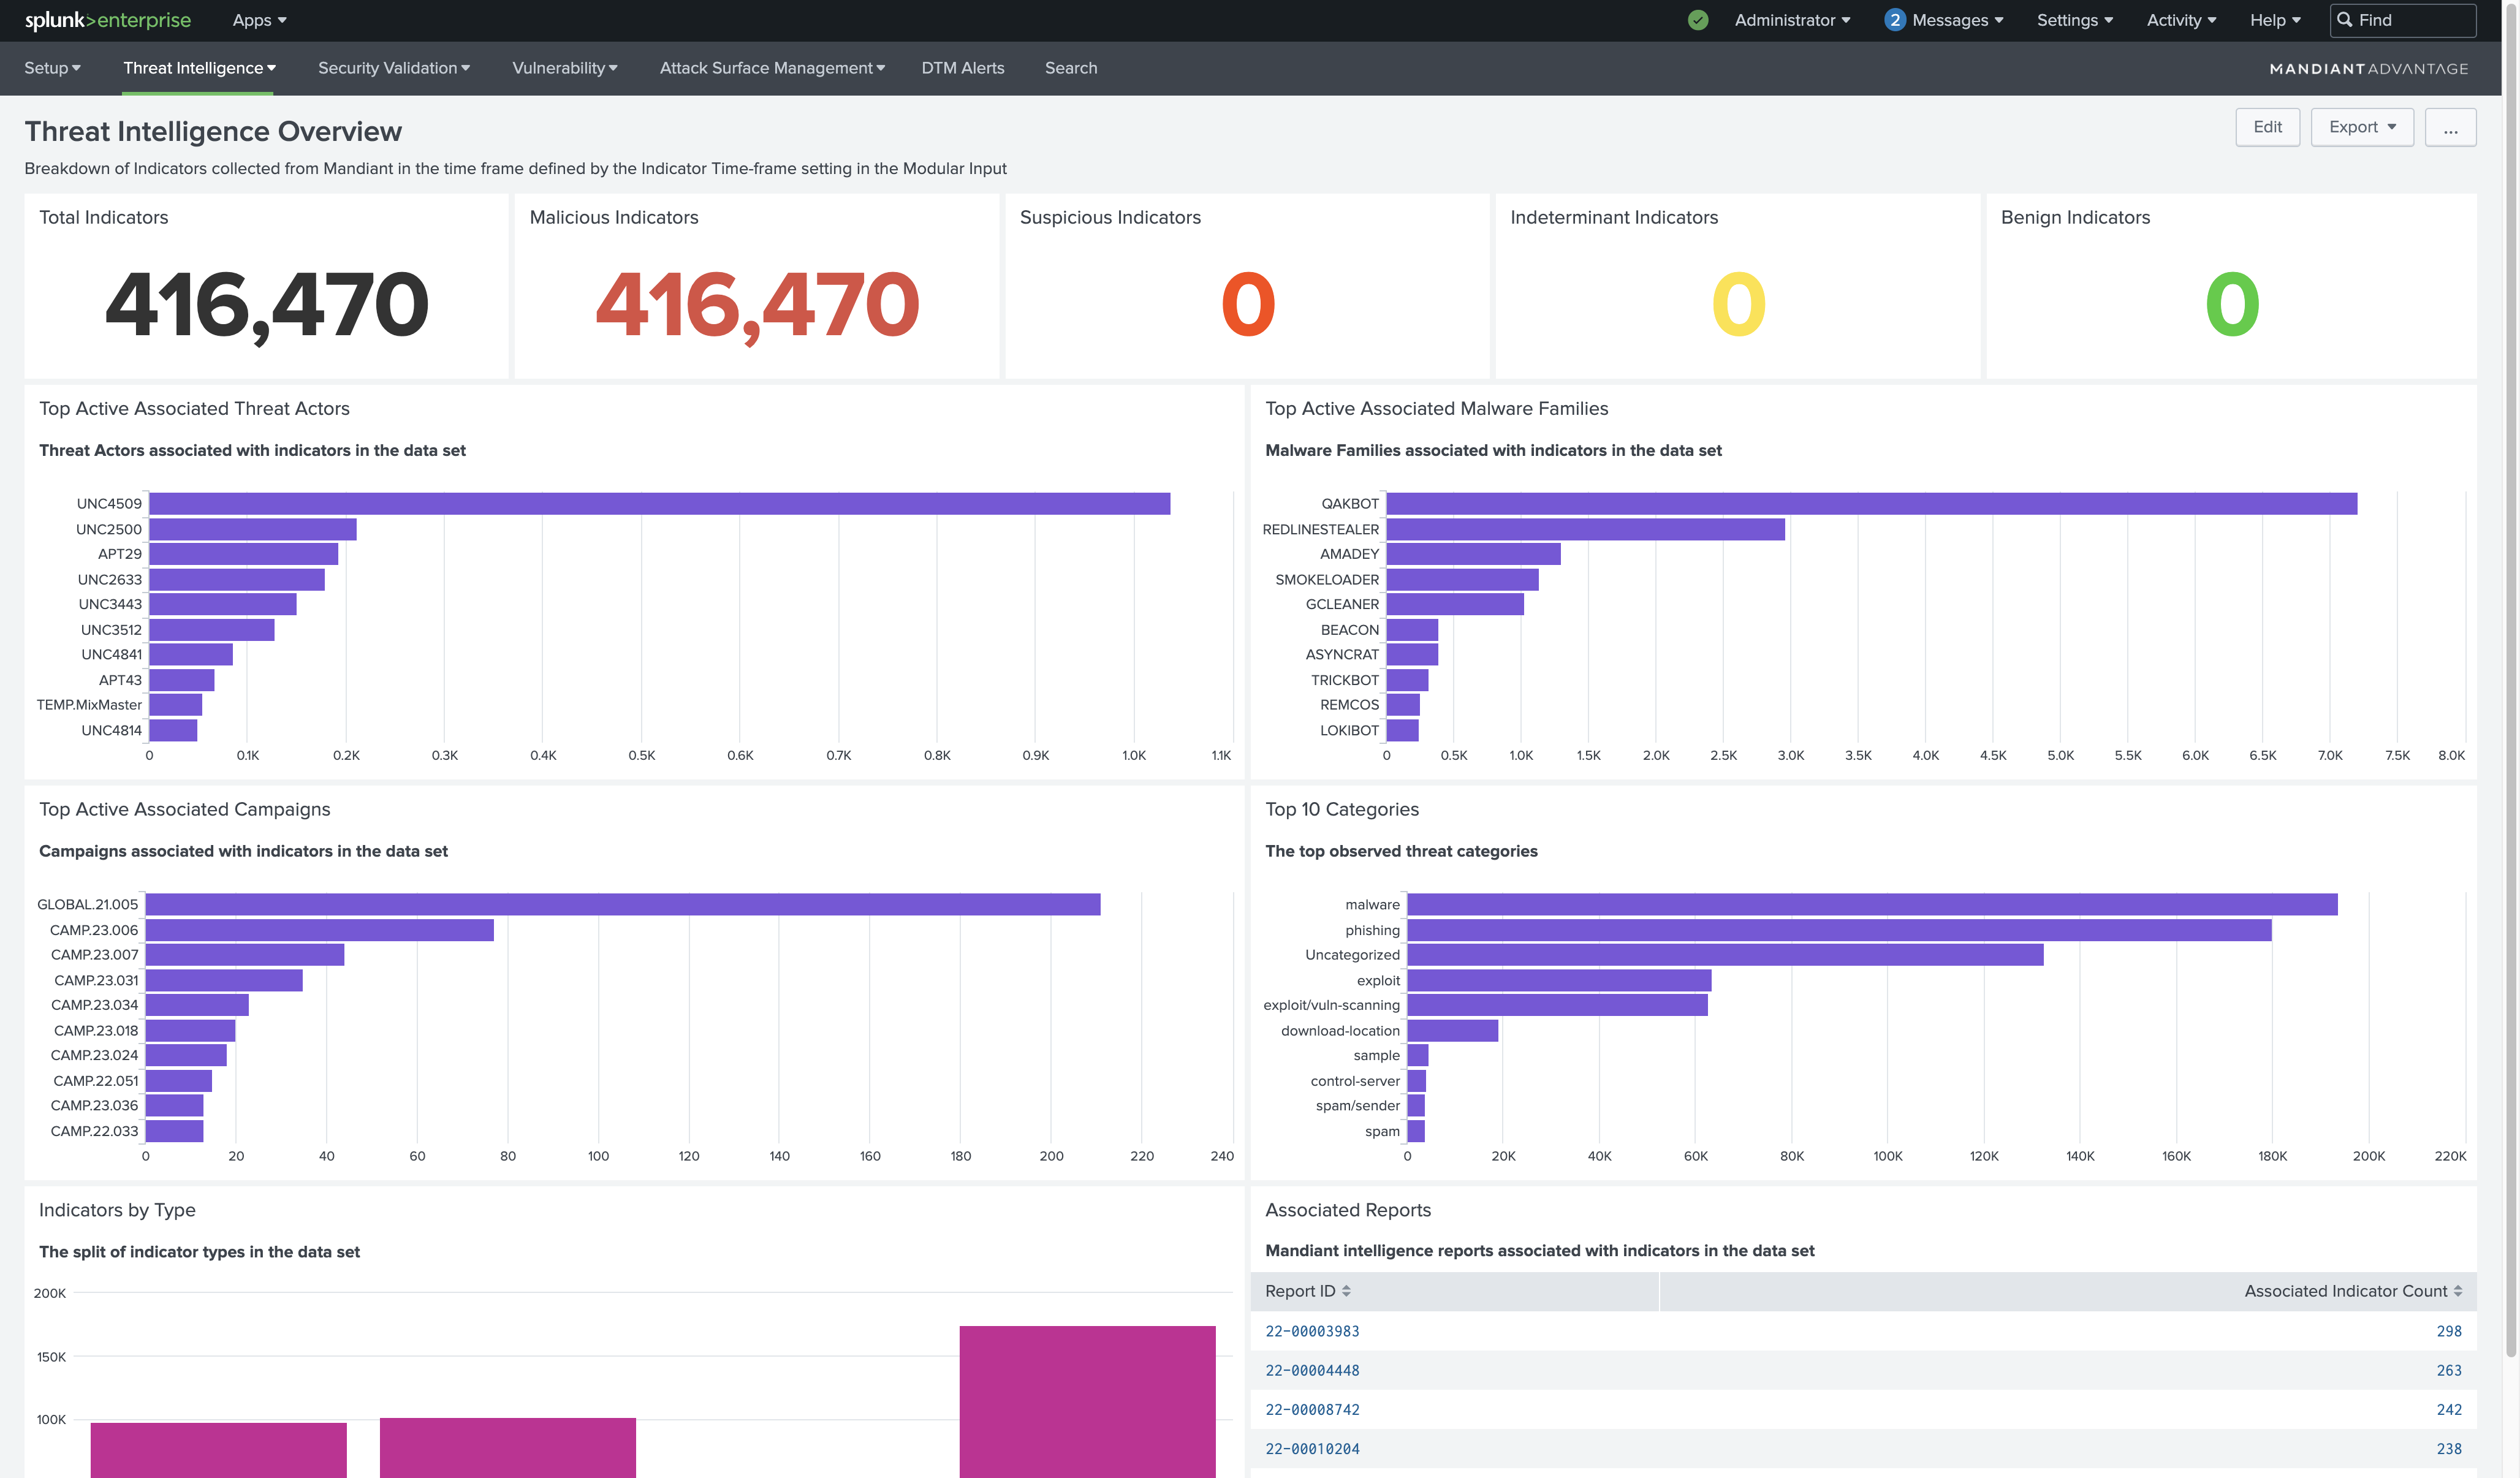 | Indicators of Compromise. Indicators can be collected from Google Threat Intelligence and added to the Splunk Key-Value (KV) Store to be used in correlation queries that can drive threat detection proactively using alerts or retrospectively as part of Threat Hunting activities. |
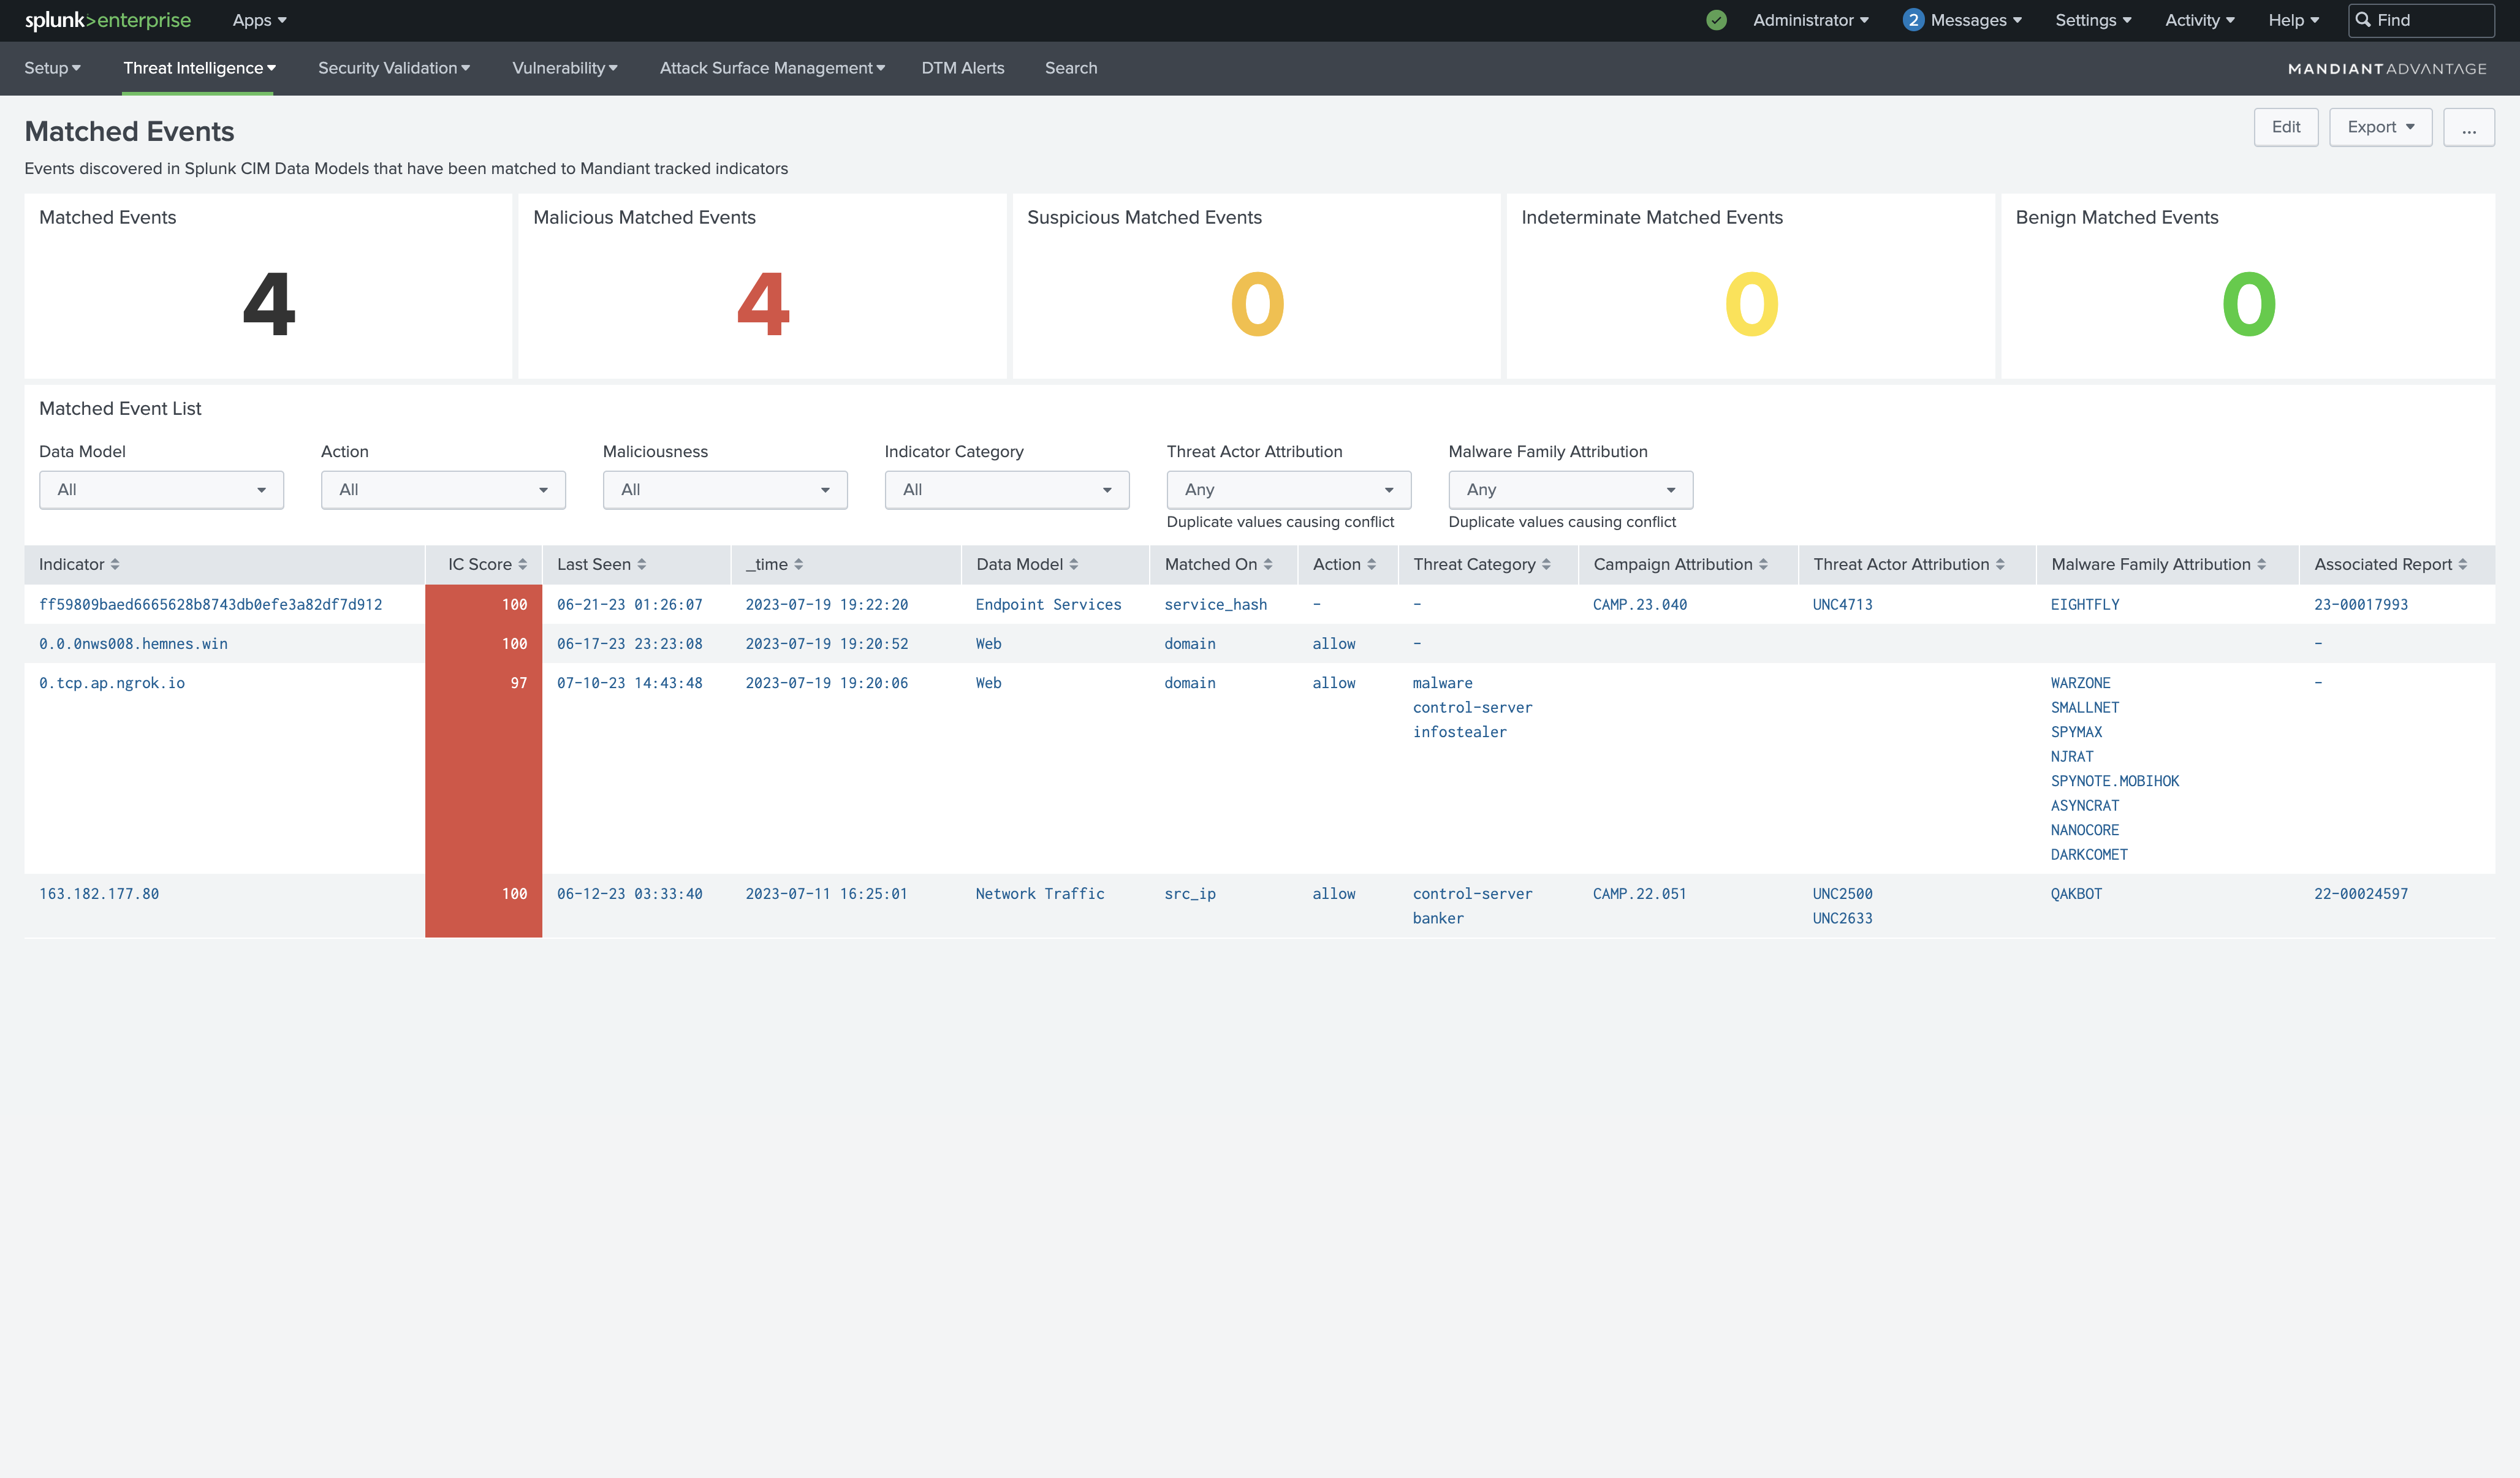 | Threat Intelligence Event Matching. Google's Threat Intelligence indicators can be matched to specific Splunk CIM Data Models to provide greater context for events in Splunk. This approach streamlines event correlation and enables attribution to specific threat actors, malware families, reports, and campaigns where the indicator was mentioned. |
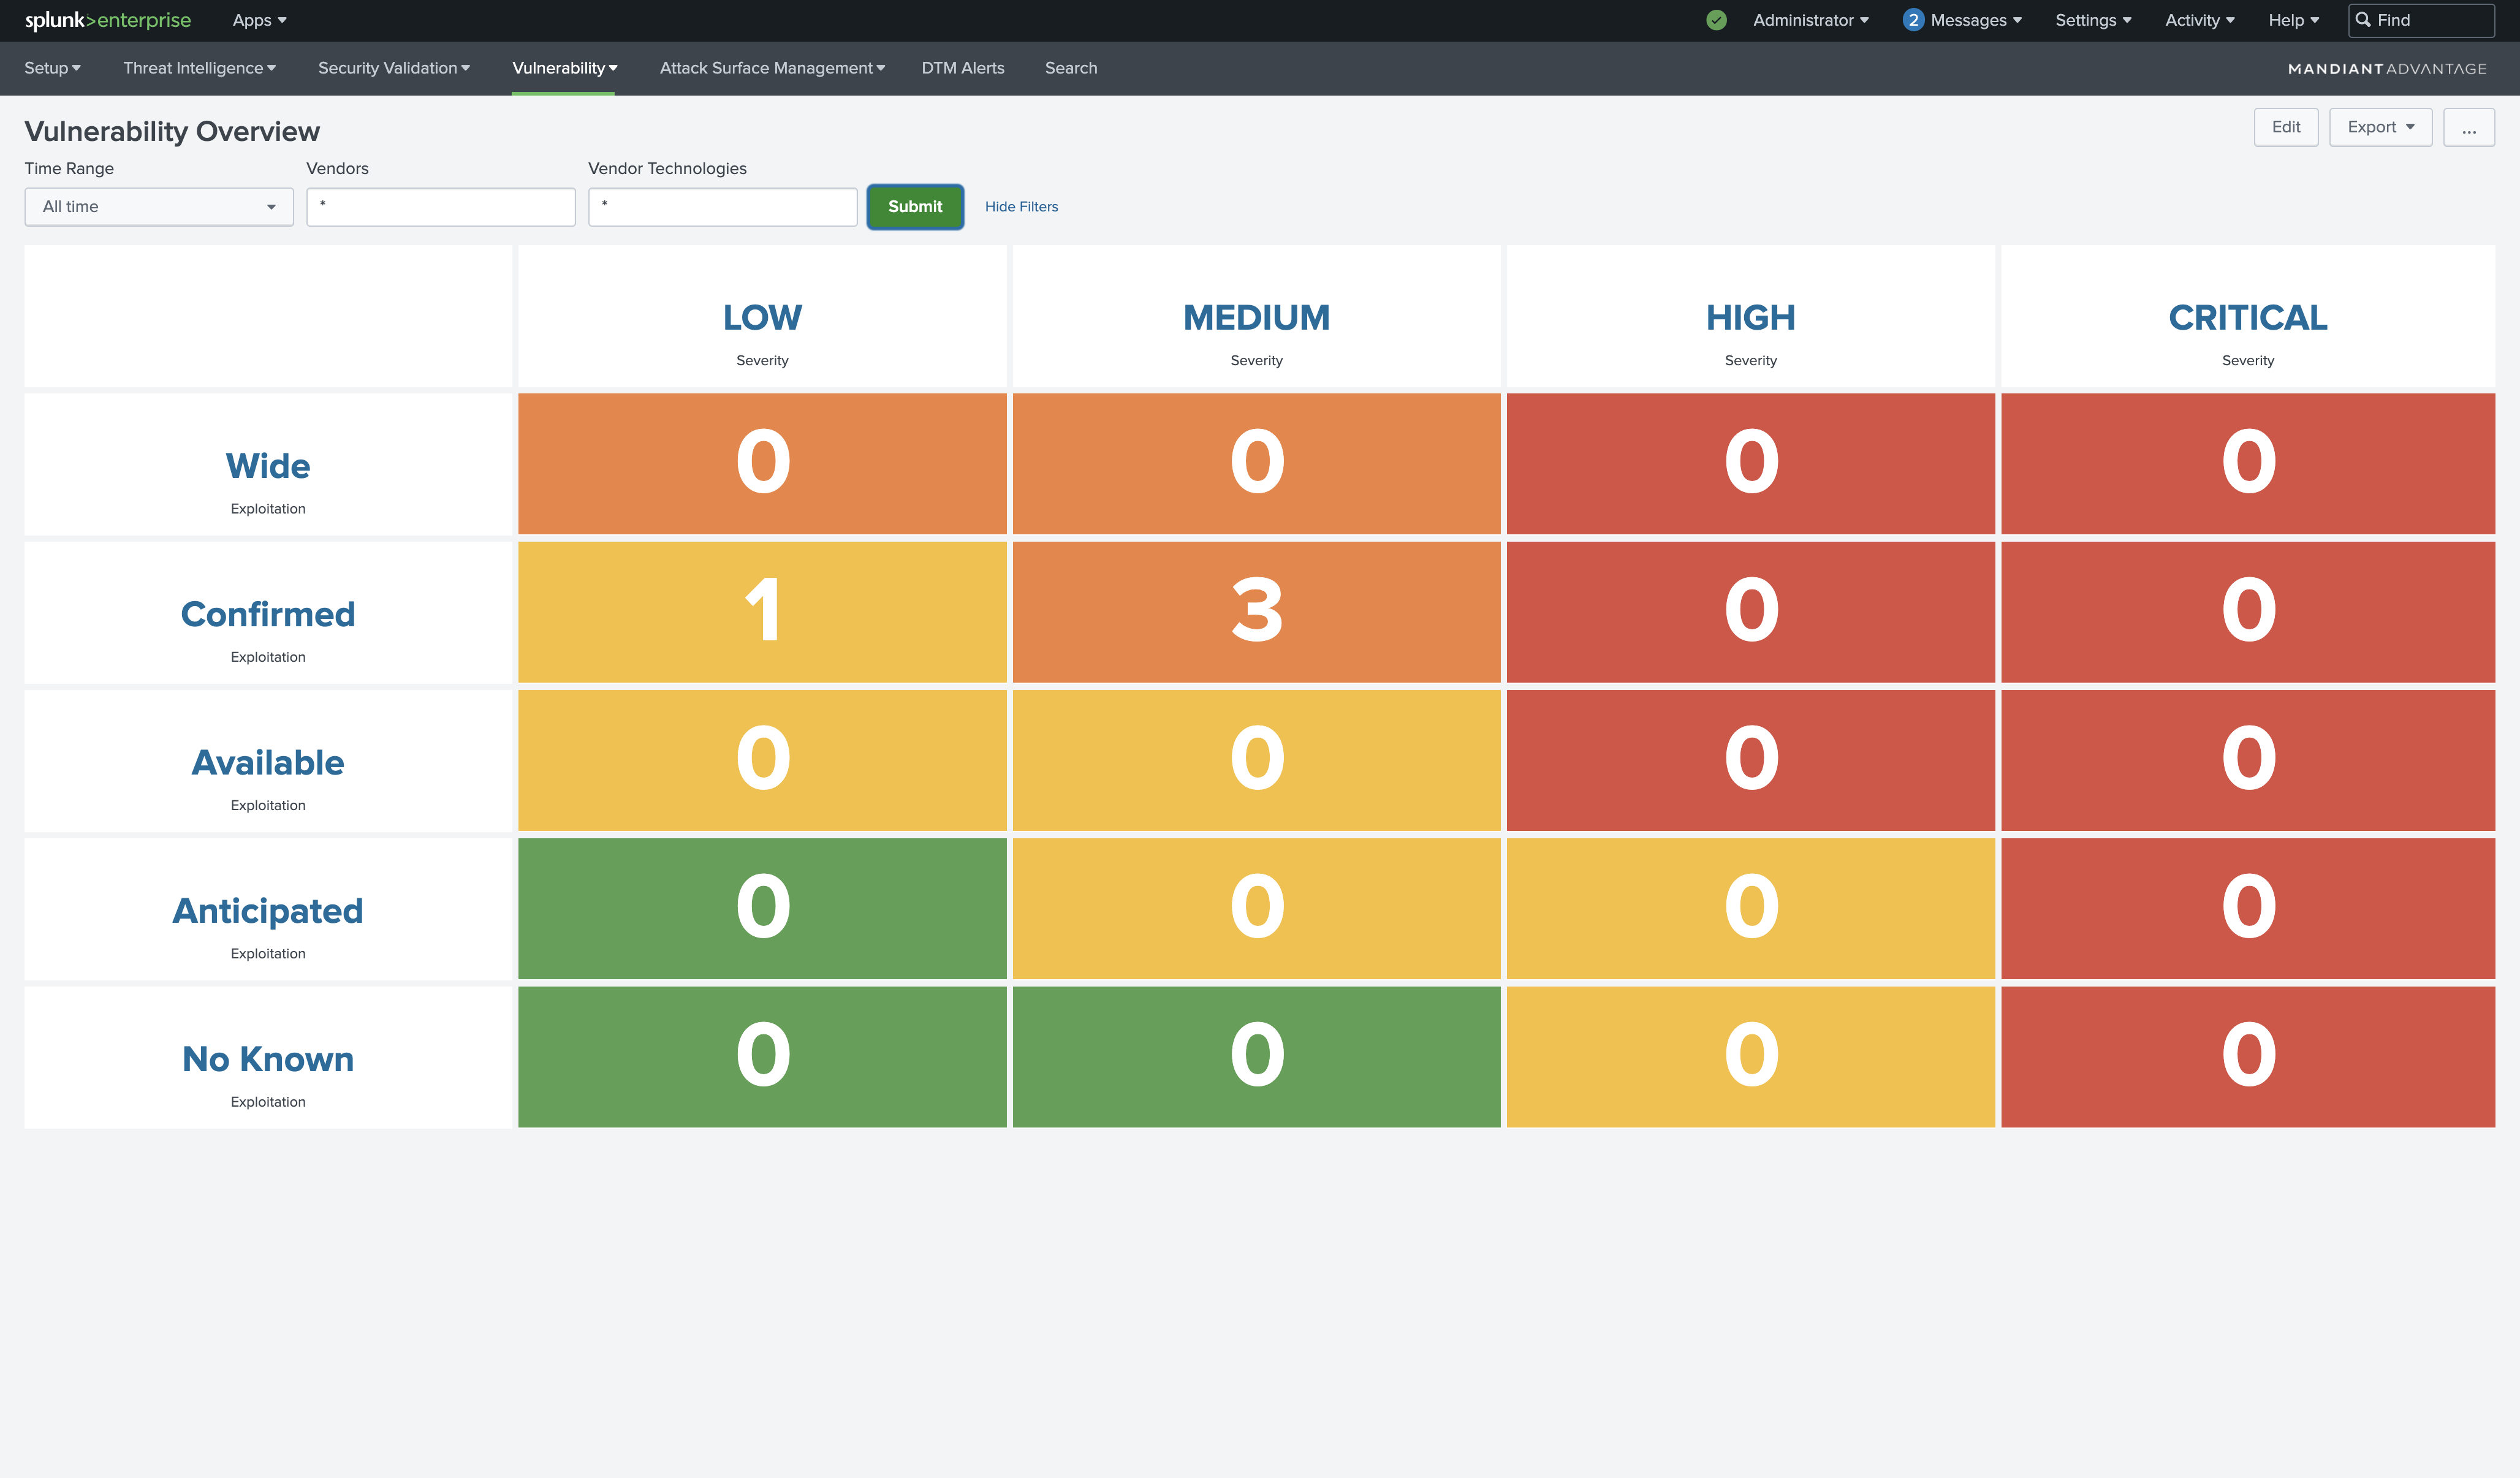 | Vulnerability Overview. The Vulnerability Overview provides an at-a-glance view of vulnerabilities detected in the environment with enriched context from Google Threat Intelligence. |
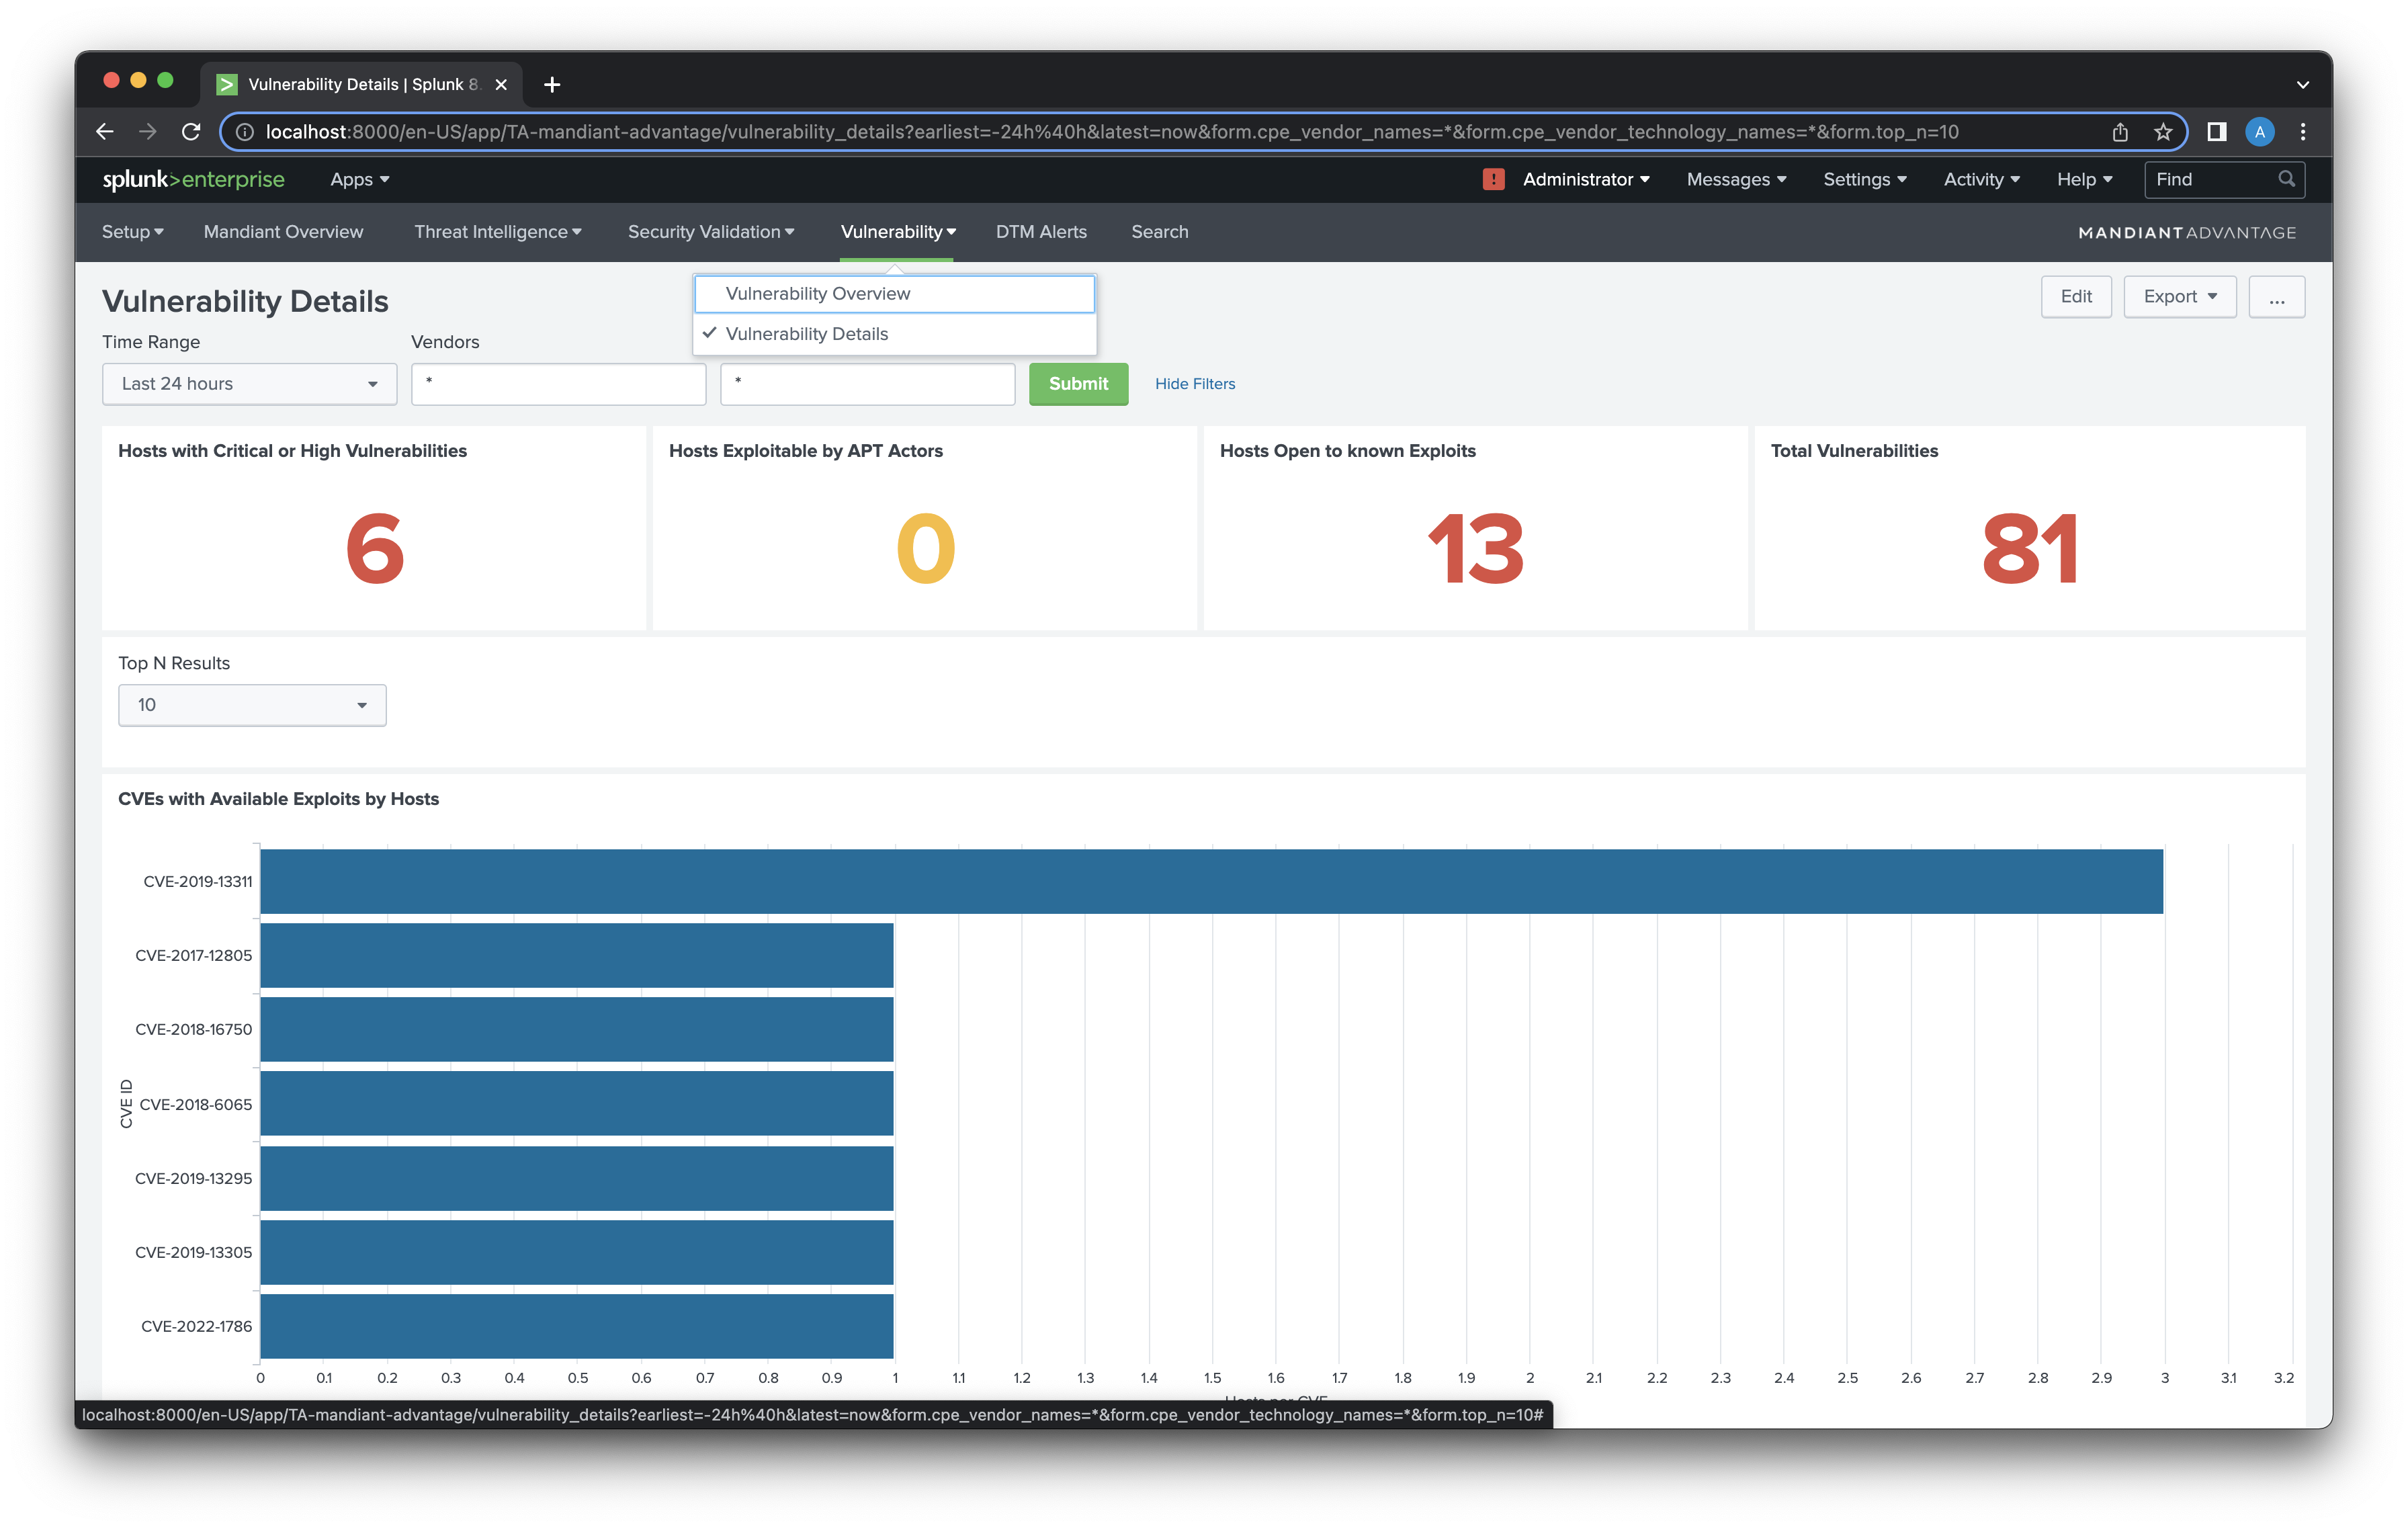 | Vulnerability Details. The Vulnerability Details dashboard correlates event data written to Splunk by security technologies with vulnerability intelligence from Google Threat Intelligence, providing a view of hosts with known vulnerabilities/exploits that can inform the analyst where to focus their attention during proactive security posture monitoring. |
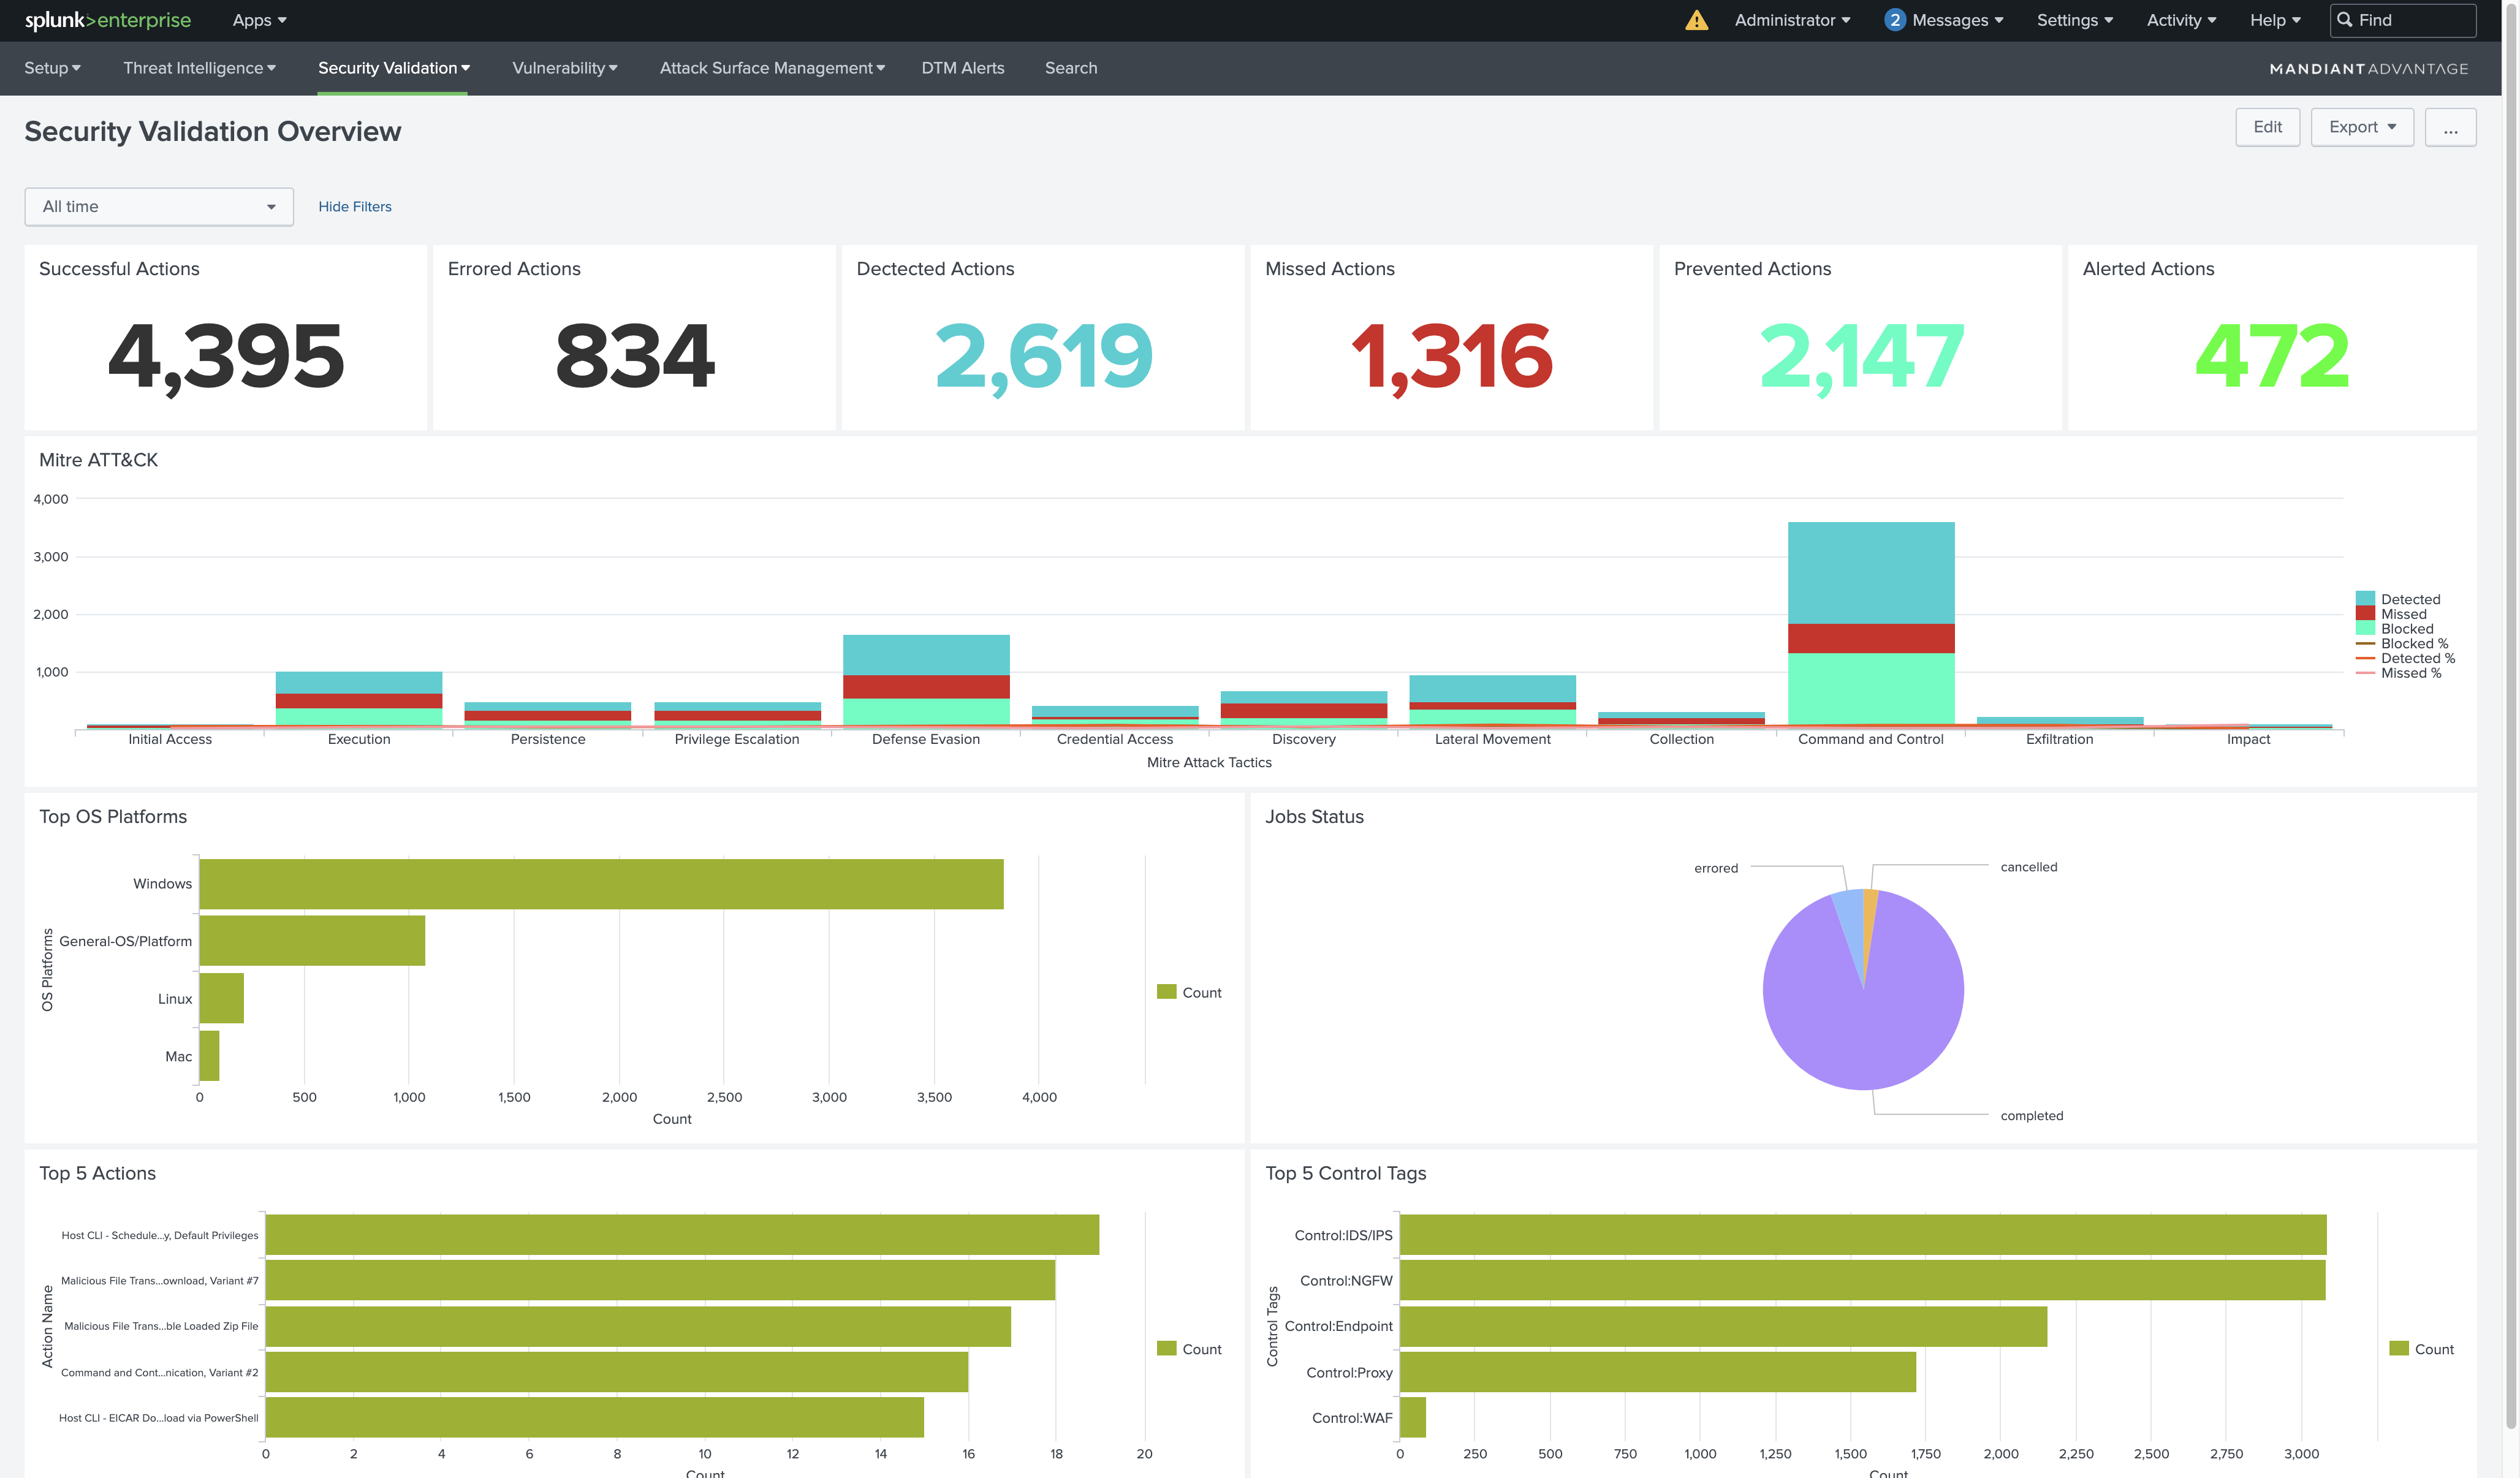 | Security Validation Overview. The Security Validation Overview dashboard provides an overview of all Security Validation activity. |
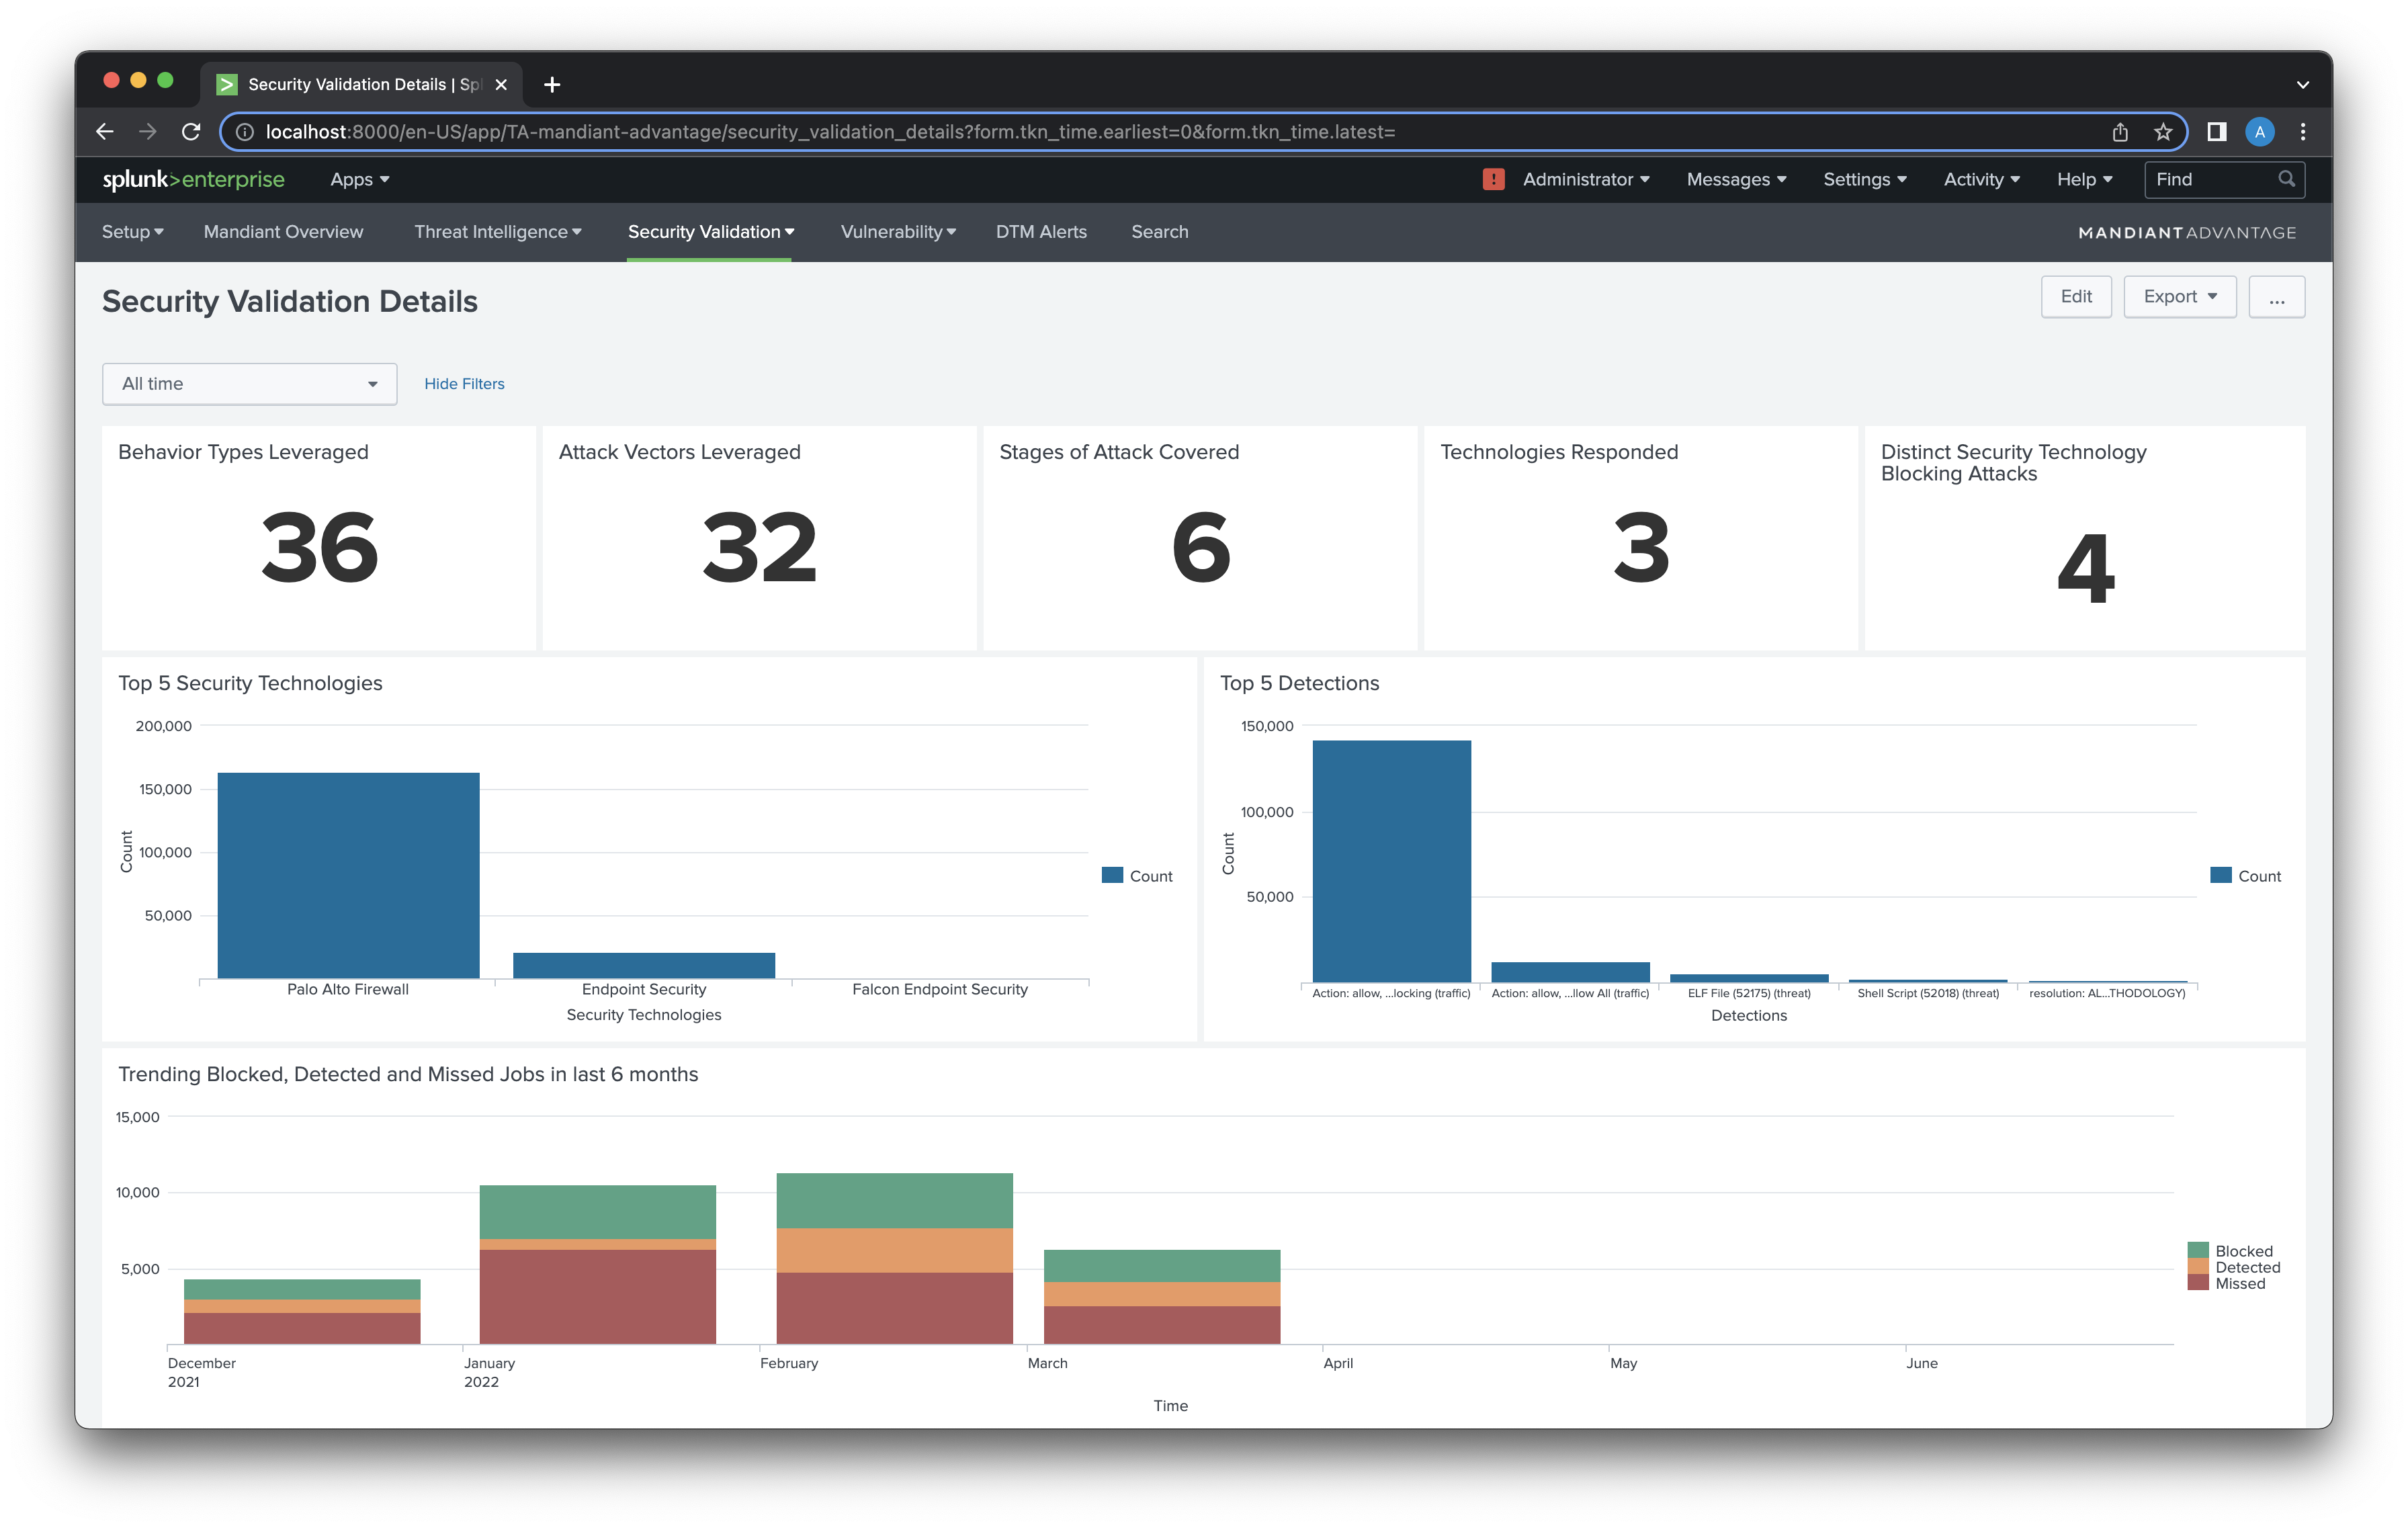 | Security Validation Details. The Security Validation Details dashboard takes a more in-depth look at Security Validation activity, broken down by Security Technology, actions, detections, and attack stages. |
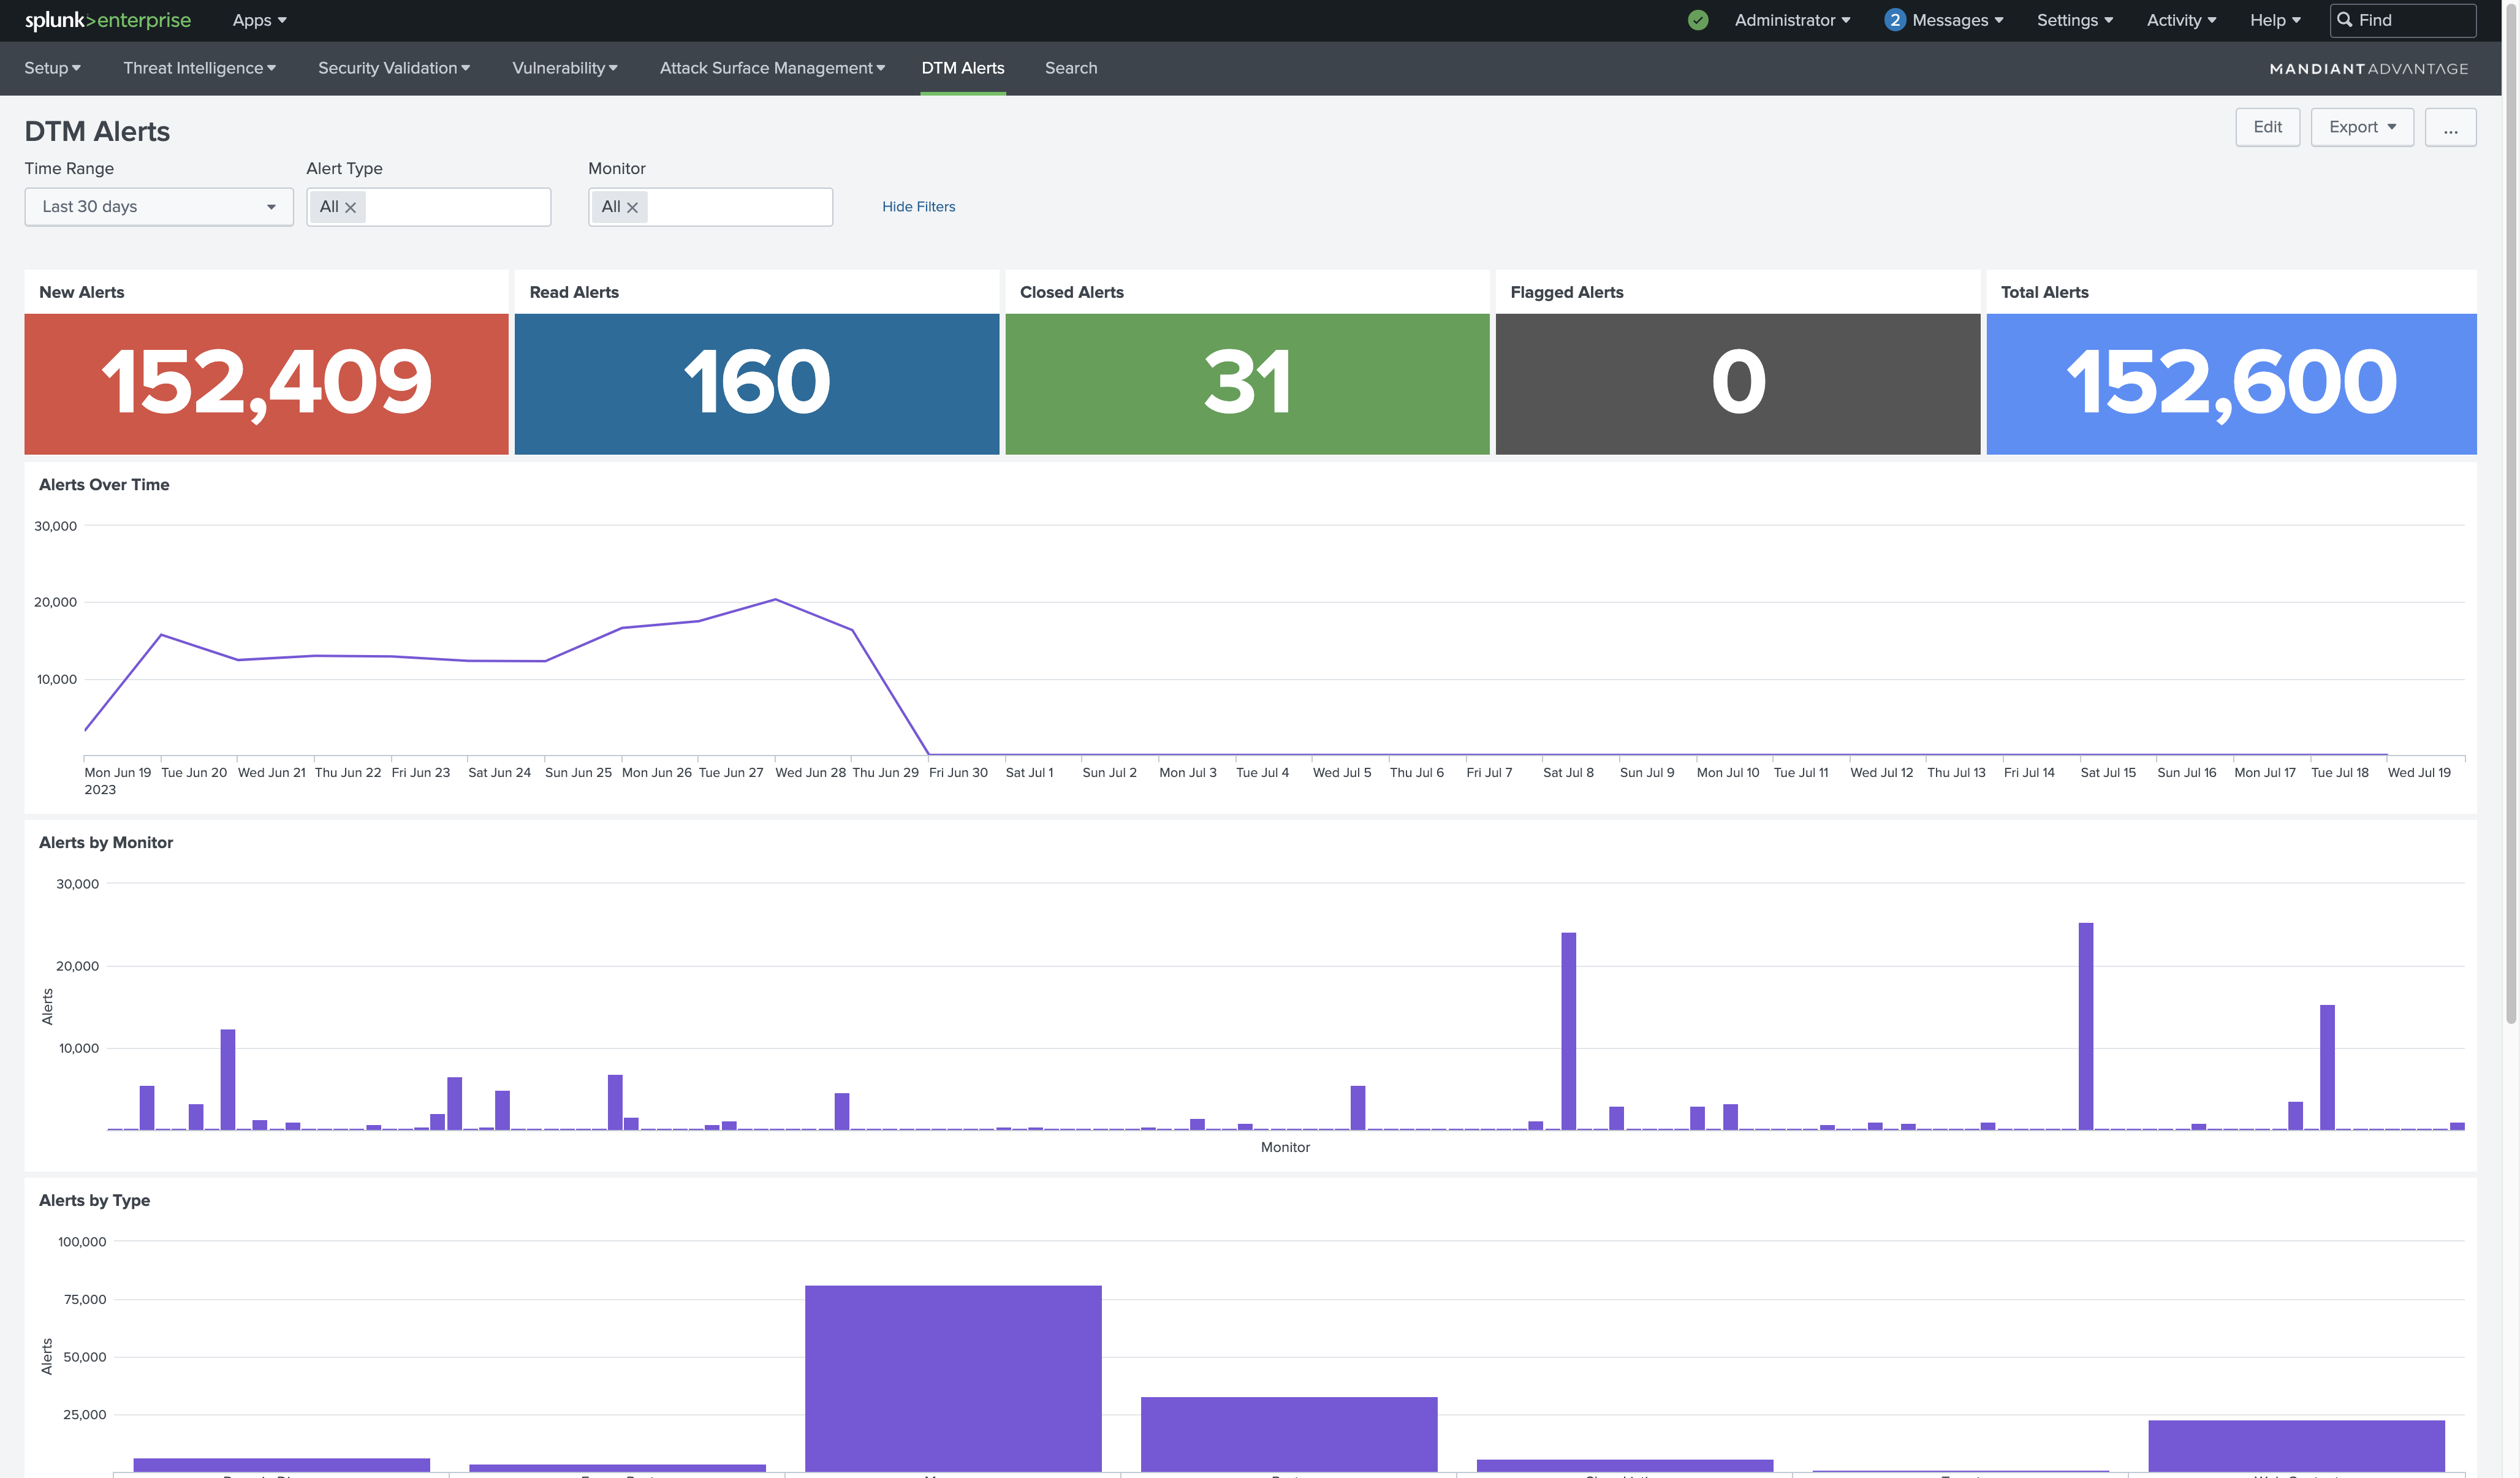 | Digital Threat Monitoring (DTM). The DTM Alerts dashboard provides a high-level overview of Alerts created by Monitors in the DTM module. |
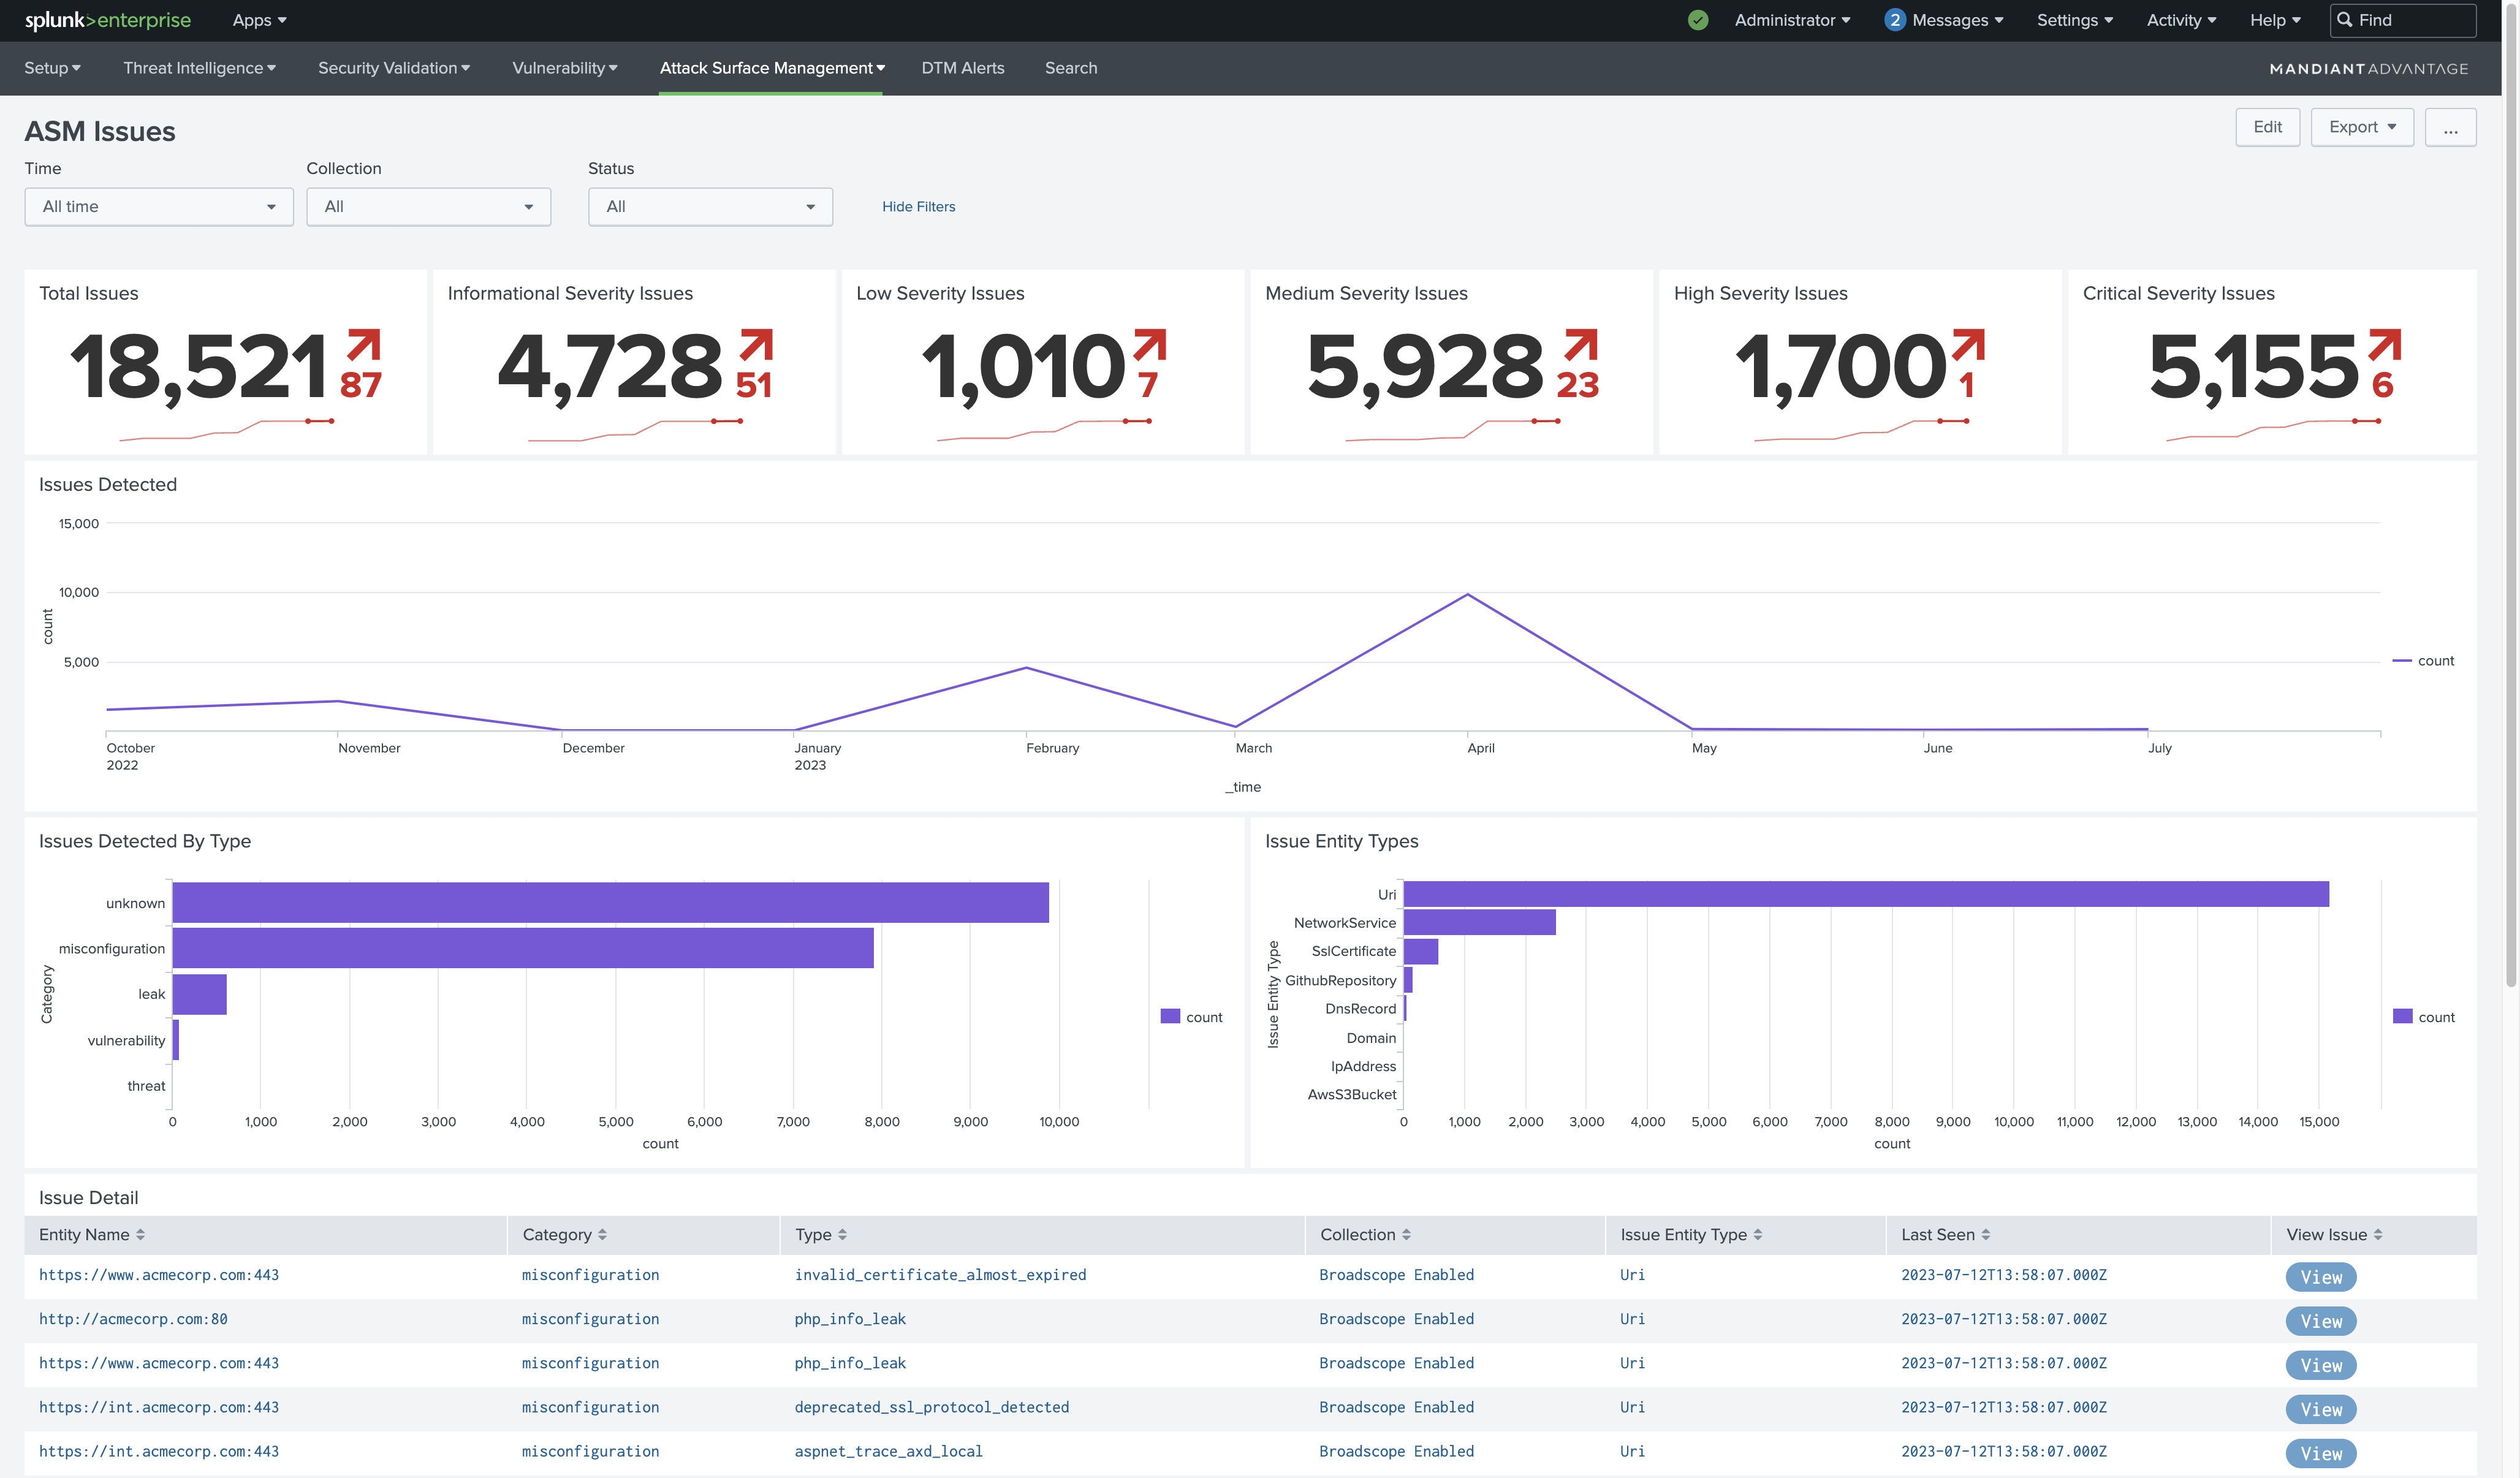 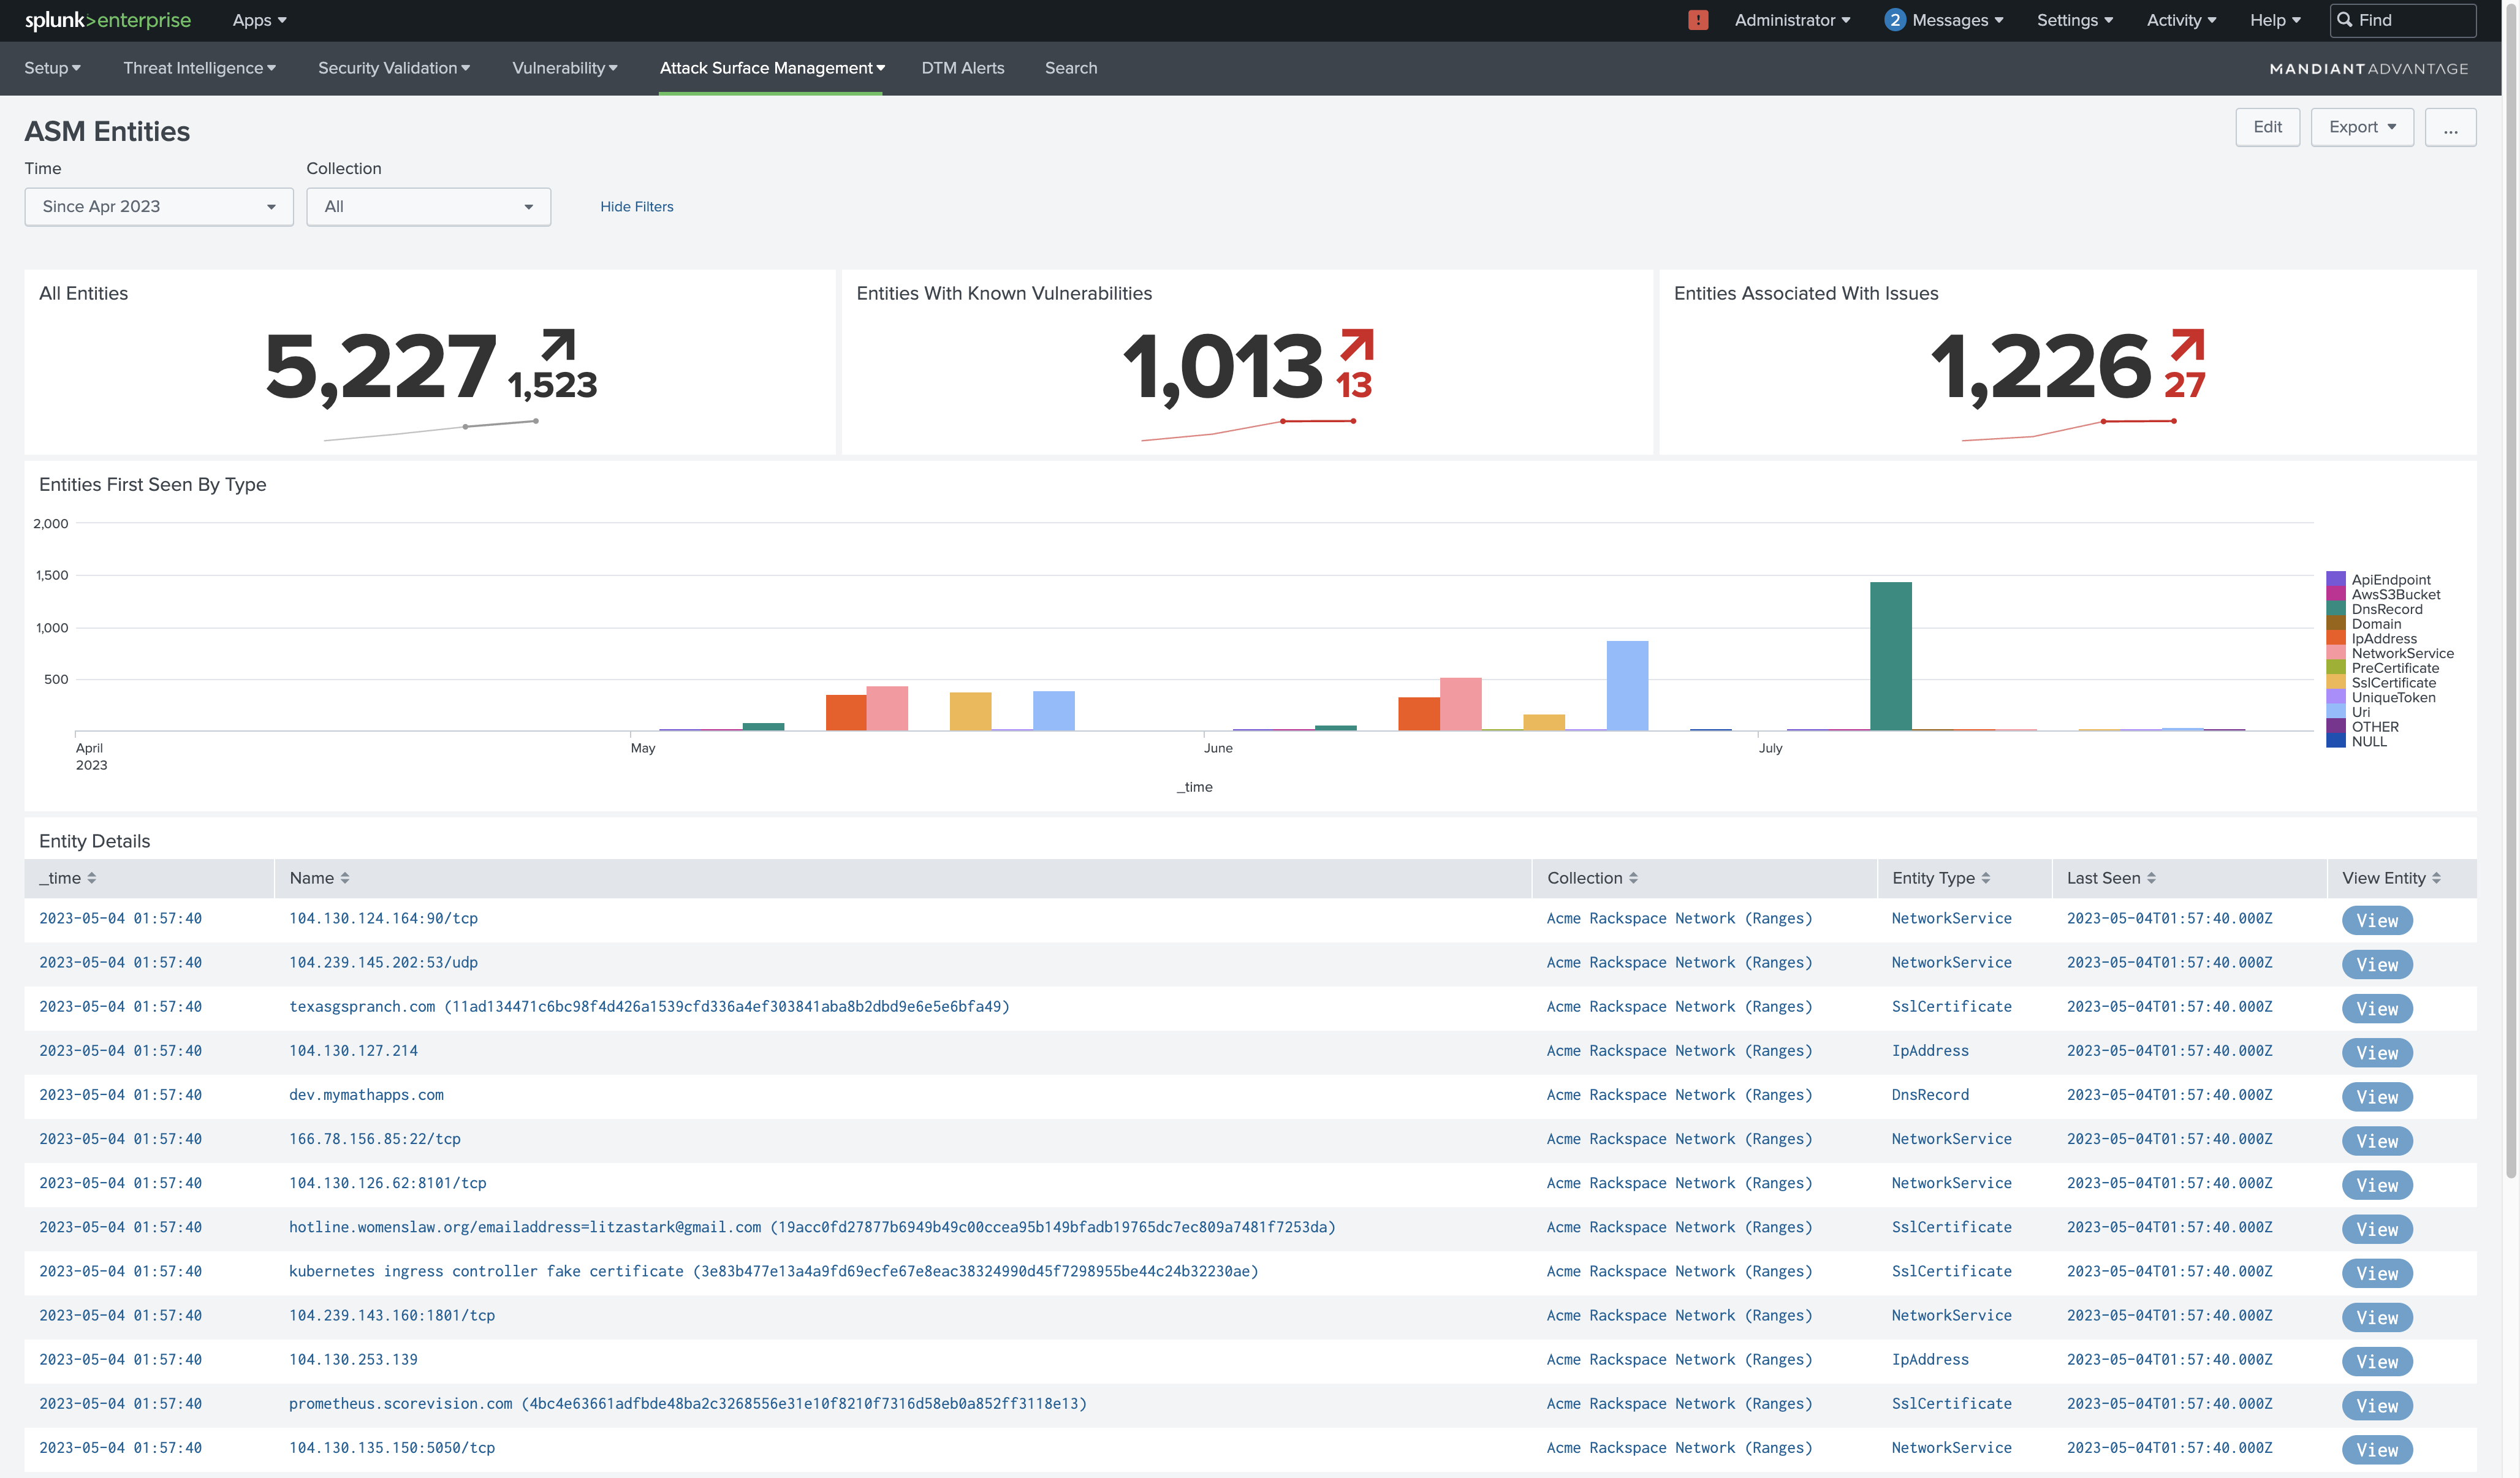 | Attack Surface Management (ASM). The ASM Issues and MA-ASM Entities dashboards provide insights into your organization's external asset inventory and related security issues. |
Compatibility Matrix
- Splunk Platform: Enterprise and Cloud
- Splunk Platform Version: 9.0, 8.2, 8.1
- Python version: Python3
- OS Support: Linux (Centos, Ubuntu) and Windows
- Browser Support: Chrome, Firefox, and Safari
Prerequisites
- Splunk Common Information Model (CIM) is required to support the Event Matching and Vulnerability Correlation features.
- Splunk Enterprise Security is required to use the Notable Events feature.
- API access Key ID and Secret generated from the MATI platform to authenticate requests from Splunk.
- Network connectivity to https://api.intelligence.mandiant.com over port 443
Get API Key ID and Secret
To obtain a Service API Key (which is tied to an organization rather than an individual user) for use with third-party security technologies such as a SIEM, contact Support.
To obtain an API Key ID and Secret for an individual user account, perform the following:
- Navigate to the Mandiant Threat Intelligence web console.
- Click Settings.
- Scroll to API Access and Keys or select it from the navigation menu.
- Click Get Key ID and Secret.
- Copy and store the displayed values in a secure location.
Installation
The Mandiant Advantage App For Splunk can be installed through the Splunk web console or by downloading the integration from Splunkbase and installing from file.
Install using the Splunk web console
- Log in to the Splunk web console and navigate to Apps > Find More Apps.
- Enter "Mandiant" in the Search field.
- Click Install.
- If prompted, enter your Splunkbase username and password.
- Click Agree and Install to complete the installation.
Install from file
- Log in to the Splunk web console and navigate to Apps > Manage Apps.
- Click Install app from file.
- Click Choose file and select the
TA-mandiant-advantageinstallation file (downloaded from Mandiant Advantage App for Splunk SIEM). - Click Upload.
- Restart Splunk if prompted.
For distributed environments, the app should be installed on both a Splunk Heavy Forwarder and a Search Head.
Upgrade from earlier versions
In some cases, the Settings page in the Splunk web console does not load after an upgrade and returns an error. This is caused by caching of the globalConfig.json file in the local browser. To resolve this issue, perform a hard reload and empty your browser cache on this page.
Configure the Mandiant Advantage App For Splunk
The app provides modular features that function independently from each other unless specifically noted. The configuration parameters for each feature are detailed in the following sections.
Enable Indicator of Compromise data collection
Enabling this feature will collect Indicators from the MATI API and write an event for each indicator to a Splunk index. A Saved Search will periodically read these events and populate the mandiant_master_lookup KV store.
The index is intended to be used for a historical view of indicators and for threat hunting use cases. The KV Store is intended to be used for correlation searches that can trigger alerts or provide context.
Complete the following workflow to enable this feature:
-
Create a Mandiant Advantage account:
In distributed environments, these steps should be completed on a Splunk Heavy Forwarder.
-
Log in to the Splunk web console, open the Mandiant Advantage App and navigate to Mandiant Advantage Configuration tab on the Setup Configuration page.
-
Click Add.
-
Enter an Account Name.
-
Select Mandiant Advantage as the type of Account to add.
-
Complete the form according to the following table.
Mandiant Account parameters Mandatory or Optional Description Account name Mandatory Name of the account Mandiant Advantage Account Mandatory Type of account for two different inputs: Mandiant Advantage and Mandiant Security Validation API Key ID Mandatory Your API Key ID generated in the MATI platform settings API Key Secret Mandatory Your API Key Secret generated in the MATI platform settings Enable Proxy Optional To enable or disable the proxy Proxy Type Mandatory Select proxy type that you want to use from the drop-down (supports HTTP/SOCK4/SOCK5) Proxy Host Mandatory Host or IP of the proxy server Proxy Port Mandatory Port for proxy server Proxy Username Optional Username of the proxy server Proxy Password Optional Password of the proxy server -
Click Add.
-
-
Create a Threat Intelligence Input:
In distributed environments, this step should be completed on a Splunk Heavy Forwarder.
-
Log in to the Splunk web console.
-
Open the Mandiant Advantage App.
-
Click Setup and select Inputs.
-
Select Create New Input
-
Select Mandiant Threat Intelligence from the drop-down menu.
-
Complete the form according to the following table.
Correlation parameters Mandatory or Optional Description Enable Event Matching Mandatory Selecting this checkbox will enable Saved Searches for Indicator to Event Matching. Data Models To Match Mandatory Saved searches corresponding to the selected Splunk CIM data models to be used for event matching. Enable Notable Alerts Optional Check this box to enable the creation of Notable Alerts. Notable Alerts are created from Mandiant Threat Intelligence Correlation matches. Exclude Unattributed Optional Select if Correlation matches without attribution to a Malware Family or Threat Actor should be considered for Notable Alert creation. Minimum Confidence Score Optional The lowest score of an indicator to be considered a match when creating a Notable Alert. Exclude Actions Optional A comma-separated list of Action field values that should cause a match to be excluded from creating a Notable Alert. For example, if Notable Alerts should not be created for events that have an Action of blocked. Exclude Categories Optional The threat categories that should cause a match to be excluded from creating a Notable Alert. For example, alerts for an event matching an indicator categorized as Spam should not be created. Severity Definition Optional If Mandiant IC-Score is selected, severity will be calculated based on Mandiant's Indicator Confidence Score (IC-Score). 1. 1. The IC-Score is a measure of confidence that the indicator is malicious and is not always reflective of criticality or urgency. For more information, see Understanding Google TI Score .
-
Click Add.
-
-
Complete the following additional steps for distributed environments:
- Disable the
mandiant_master_lookupsaved search on the Heavy Forwarder. This search creates a lookup table that is only required on the search head. - Ensure the app is installed on a Search Head and that the
mandiant_master_lookupsaved search is enabled.
- Disable the
The mandiant_master_lookup saved search sets the index, IC-Score value, and time period of the query using macros. These macros have the following default values:
[mandiant_indicator_index]
definition = main

[mandiant_indicator_time_window]
definition = 30

[mandiant_min_ic_score]
definition = 80
These values are set when the Threat Intelligence Modular Input is saved. Because the Threat Intelligence Modular Input is not configured on the Search Head, it's possible to override the defaults using config files. Complete the following steps to override the default settings:
- Create a file named
macros.confin the$SPLUNK_HOME/etc/apps/TA-mandiant-advantage/localdirectory on the search head where the Mandiant app is installed and themandiant_master_lookupsaved search is enabled. - Copy and paste the three default values from the previous code snippet into the file.
- Edit the definition key of each macro to the desired value.
- Save the file.
Enable Indicator to Event Matching
Threat Intelligence Event Matching uses the Splunk Common Information Model data models to match indicators against Threat Intelligence from Mandiant. When a match is discovered an entry is added to the mandiant_matched_events lookup table for later use in dashboards and to generate notable alerts.
Before using this feature, ensure that you have successfully enabled the Indicator of Compromise Data Collection feature.
Notable Alerts requires Splunk Enterprise Security.
Complete the following workflow to enable this feature.
In distributed environments, this step should be completed on a Splunk Search Head.
-
In the Splunk web console, click Setup and select Configuration.
-
Navigate to the Indicator > Event Matching tab.
-
Complete the form according to the following table.
Correlation parameters Mandatory or Optional Description Enable Event Matching Mandatory Selecting this checkbox will enable Saved Searches for Indicator to Event Matching. Data Models To Match Mandatory Saved searches corresponding to the selected Splunk CIM data models to be used for event matching. Enable Notable Alerts Optional Check this box to enable the creation of Notable Alerts. Notable Alerts are created from Mandiant Threat Intelligence Correlation matches. Exclude Unattributed Optional Select if Correlation matches without attribution to a Malware Family or Threat Actor should be considered for Notable Alert creation. Minimum Confidence Score Optional The lowest score of an indicator to be considered a match when creating a Notable Alert. Exclude Actions Optional A comma-separated list of Action field values that should cause a match to be excluded from creating a Notable Alert. For example, if Notable Alerts should not be created for events that have an Action of blocked. Exclude Categories Optional The threat categories that should cause a match to be excluded from creating a Notable Alert. For example, alerts for an event matching an indicator categorized as Spam should not be created. Severity Definition Optional If Mandiant IC-Score is selected, severity will be calculated based on Mandiant's Indicator Confidence Score (IC-Score). 1. The IC-Score is a measure of confidence that the indicator is malicious and is not always reflective of criticality or urgency. For more information, see Understanding Google TI Score .
-
Click Save.
Enable Vulnerability Correlation
This feature correlates events containing CVE values with intelligence from Mandiant in order to inform analysts about hosts in the environment that represent a security risk. The correlation also provides the analyst with a risk rating and any known mitigations.
- This feature requires access to both the Splunk indexes and the Mandiant API.
- This feature is not supported in Splunk environments where the Search head cannot access the Mandiant API (
<https://api.intelligence.mandiant.com>).
To enable this feature, complete the following workflow:
In distributed environments, these steps should be completed on a Search Head with internet access.
-
Create a Mandiant Advantage account.
This is the same account used for Indicator of Compromise data collection.
-
In the Splunk web console, click Setup and select Configuration.
-
Navigate to the Vulnerability Correlation Settings tab.
-
Complete the form according to the following table.
Correlation parameters Description Enable Vuln Correlation Selecting this box will enable the Vulnerability Correlation searches. Mandiant Advantage Account Choose the associated Mandiant Advantage Account. Vuln Indices Enter indices for which Vulnerability Correlation needs to be performed. Vuln Sourcetypes Enter sourcetype for which Vulnerability Correlation needs to be performed. Vuln Fields Enter fields against which Vulnerability Correlation needs to be performed. Vuln Time Window This defines the number of days correlated vulnerability data will be kept in the mandiant_vuln_matched_lookuplookup table. -
Click Save.
Enable ASM data collection
This feature lets Splunk collect data related to your organization's external asset inventory and related security issues.
Complete the following workflow to enable this feature:
-
Create a Mandiant Advantage account:
In distributed environments, these steps should be completed on a Splunk Heavy Forwarder.
-
Log in to the Splunk web console, open the Mandiant Advantage App.
-
Navigate to Mandiant Advantage Configuration tab on the Setup Configuration page.
-
Click Add.
-
Enter an Account Name.
-
Select Mandiant Advantage as the type of Account to add.
-
Complete the form according to the following table.
Mandiant Account parameters Mandatory or Optional Description Account name Mandatory Name of the account Mandiant Advantage Account Mandatory Type of account: Select Mandiant MA-ASM Endpoint URL Mandatory The Endpoint URL for the Mandiant MA-ASM API (asm-api.advantage.mandiant.com) without http://orhttps://Access Key Mandatory The MA-ASM API Access Key Secret Key Mandatory The MA-ASM API Access Key Verify SSL Certificate Optional Specify whether API calls should be validated with certificates or not Enable Proxy Optional To enable or disable the proxy Proxy Type Mandatory Select proxy type that you want to use from the drop-down (supports HTTP/SOCK4/SOCK5) Proxy Host Mandatory Host or IP of the proxy server Proxy Port Mandatory Port for proxy server Proxy Username Optional Username of the proxy server Proxy Password Optional Password of the proxy server
-
-
Create MA-ASM Inputs.
In distributed environments, these steps should be completed on a Splunk Heavy Forwarder.
-
Log in to the Splunk web console.
-
Open the Mandiant Advantage App.
-
Click Setup and select Inputs.
-
Select Create New Input.
-
Select Mandiant MA-ASM Issues or Mandiant MA-ASM Entities from the drop-down menu.
-
Depending on the type of input selected, complete the form according to the following Issues and Entities tables.
Mandiant MA-ASM Issues InputInput Parameter Mandatory or Optional Description Name Mandatory A name to uniquely identify the input Interval Mandatory Interval in seconds Index Mandatory Index in which to store the data Mandiant Advantage Account Mandatory The Mandiant Account to be used must be of type MA-ASM Alerts Time Window Optional The number of days in the past to start the collection of Issue data from. Default 30 days ASM Project and Collection Mandatory The MA-ASM Collection to collect issues from, this list is dynamically populated Issue Severity Mandatory The minimum issue severity to collect Mandiant MA-ASM Entities InputInput Parameter Mandatory or Optional Description Name Mandatory A name to uniquely identify the input Interval Mandatory Interval in seconds Index Mandatory Index in which to store the data Mandiant Advantage Account Mandatory The Mandiant Account to be used must be of type MA-ASM Alerts Time Window Optional The number of days in the past from which to start the collection of Entity data; default 30 days ASM Project and Collection Mandatory The MA-ASM Collection from which entities are to be collected; this list is dynamically populated Query Optional A text string to further refine which entities are collected from MA-ASM -
Click Add to create the input.
-
-
Configure Dashboard Settings.
- In the Splunk web console, click Setup and select Configuration.
- Navigate to Dashboard Settings tab.
- Enter the name of the indices where the MA-ASM Modular Inputs were configured to write events to in the MA-ASM Issues Indices setting.
- Click Save.
Enable Security Validation data collection
This feature enables data sharing between Splunk and MSV to continuously validate your cybersecurity controls.
Complete the following workflow to enable this feature:
-
Create a Mandiant Advantage account:
In distributed environments, these steps should be completed on a Splunk Heavy Forwarder.
-
In the Splunk web console, open the Mandiant Advantage App and navigate to Mandiant Advantage Configuration tab on the Setup Configuration page.
-
Click Add.
-
Enter an Account Name.
-
Select Mandiant Advantage as the type of Account to add.
-
Complete the form according to the following table.
Mandiant Account parameters Mandatory or Optional Description Account name Mandatory Name of the account Mandiant Advantage Account Mandatory Type of the account for two different inputs: Mandiant Advantage and Mandiant Security Validation Endpoint URL Mandatory The Endpoint URL of your Security Validation instance without http://orhttps://API Token Mandatory The Security Validation API Token API Version Mandatory The Security Validation API version Verify SSL Certificate Optional Specify whether API calls should be validated with certificates or not Enable Proxy Optional To enable or disable the proxy Proxy Type Mandatory Select proxy type that you want to use from the drop-down (supports HTTP/SOCK4/SOCK5) Proxy Host Mandatory Host or IP of the proxy server Proxy Port Mandatory Port for proxy server Proxy Username Optional Username of the proxy server Proxy Password Optional Password of the proxy server
-
-
Create a Mandiant Validation Input.
In distributed environments, these steps should be completed on a Splunk Heavy Forwarder.
-
In the Splunk web console, open the Mandiant Advantage App.
-
Click Setup and select Configuration.
-
Click Create New Input.
-
Select Mandiant Validation from the drop-down menu.
-
Complete the form according to the table below.
Input Parameter Mandatory or Optional Description Name Mandatory A name to uniquely identify the input Interval Mandatory Interval in seconds Index Mandatory Index in which to store the data Mandiant Advantage Account Mandatory The Mandiant Account to be used Delay (In Minutes) Mandatory The amount of time to wait for Security Validation to retrieve correlation and integration events -
Click Add to create the input.
-
-
Configure Dashboard Settings.
- In the Splunk web console, click Setup and select Configuration.
- Navigate to the Dashboard Settings tab..
- Enter the name of the indices where the MA-ASM Modular Inputs were configured to write events to in the MA-ASM Issues Indices setting.
- Click Save.
Enable DTM data collection
This feature lets you view Alerts generated by Monitors configured in DTM. Complete the following workflow to enable this feature.
-
Create a Mandiant Advantage account.
This is the same account used for Indicator of Compromise data collection.
-
Create a DTM Alerts Input.
In distributed environments, this step should be completed on a Splunk Heavy Forwarder.
-
Log in to the Splunk web console and open the Mandiant Advantage App.
-
In the Splunk web console, click Setup and select Configuration.
-
Click Create New Input and select Mandiant Threat Intelligence from the drop-down menu.
-
Complete the form according to the following table.
Input Parameter Mandatory or Optional Description Name Mandatory A name to uniquely identify the input Interval Mandatory Interval in seconds Index Mandatory Index in which to store the data Mandiant Advantage Account Mandatory The Mandiant Account to be used Alerts Time Window Optional The number of days in the past to start the collection of Alert data from (Default is 7 days.)
-
-
In the Splunk web console, click Setup and select Configuration.
-
Navigate to Dashboard Settings tab.
-
Enter the name of the indices where the DTM Alerts Modular Inputs were configured to write events to in the DTM Alert Indices setting
-
Click Save.
Saved Searches
The application contains the following Saved Searches:
All Saved Searches are disabled by default and enabled in Settings.
- mandiant_match_vulnerabilities: Match vulnerabilities from the selected indices and sourcetypes and collect the matched vulnerabilities to look up.
- mandiant_retire_vulnerabilities: Delete Mandiant vulnerabilities that are older than the configured number of days.
- mandiant_match_events_authentication: Queries the Authentication CIM Data Model and uses the
mandiantmatcheventscommand to correlate thesrcordestfields with Mandiant indicators in the mandiant_master_lookup. Results of matched events are added to the mandiant_matched_events key-value (KV) store. - mandiant_match_events_endpoint_process: Queries the Endpoint Services CIM Data Model and uses the
mandiantmatcheventscommand to correlate thefile_hashordestfields with Mandiant indicators in the mandiant_master_lookup. Results of matched events are added to the mandiant_matched_events KV store. - mandiant_match_events_endpoint_filesystem: Queries the Endpoint Filesystem CIM Data Model and uses the
mandiantmatcheventscommand to correlate thefile_hashordestfields with Mandiant indicators in the mandiant_master_lookup. Results of matched events are added to the mandiant_matched_events KV store. - mandiant_match_events_intrusion_detection: Queries the Intrusion Detection CIM Data Model and uses the
mandiantmatcheventscommand to correlate thefile_hash,src, ordestfields with Mandiant indicators in the mandiant_master_lookup. Results of matched events are added to the mandiant_matched_events KV store. - mandiant_match_events_malware_attacks: Queries the Malware Attacks CIM Data Model and uses the
mandiantmatcheventscommand to correlate thefile_hash,src,dest, orurlfields with Mandiant indicators in the mandiant_master_lookup. Results of matched events are added to the mandiant_matched_events KV store. - mandiant_match_events_network_resolution: Queries the Network Resolution CIM Data Model and uses the
mandiantmatcheventscommand to correlate thesrc,dest, ordomainfields with Mandiant indicators in the mandiant_master_lookup. Results of matched events are added to the mandiant_matched_events KV store. - mandiant_match_events_network_traffic: Queries the Network Traffic CIM Data Model and uses the
mandiantmatcheventscommand to correlate thesrc_ip,dest_ip,src, ordestfields with Mandiant indicators in the mandiant_master_lookup. Results of matched events are added to the mandiant_matched_events KV store. - mandiant_match_events_events_web: Queries the Web CIM Data Model and uses the
mandiantmatcheventscommand to correlate thesrc,dest,url, ordomainfields with Mandiant indicators in the mandiant_master_lookup. Results of matched events are added to the mandiant_matched_events KV store. - mandiant_create_notables: Queries the mandiant_matched_events KV store for events and uses the
manditantnotablescommand to create a Splunk Notable Alert for each result found. - You can review the last execution of a saved search by clicking View Recent for that saved search on the Searches, Reports, and Alerts tab.
Lookups
The application creates the following Splunk KV store lookup tables:
-
mandiant_master_lookup: Populated by the Mandiant Threat Intelligence Modular Input and contains Mandiant indicator data. The indicator value is used as the primary key for the lookup.
Example queries:
Get all indicators:
| inputlookup mandiant_master_lookup | eval indicator_value=_keyUse the lookup:
base search | lookup mandiant_master_lookup _key AS fieldWhere:
base_searchis your Splunk searchfieldis the field that you want to match to an indicator value -
mandiant_matched_events: Contains data about events that were matched against Mandiant indicators as a result of the Event Matching feature.
Example query:
| inputlookup mandiant_matched_events -
mandiant_vuln_matched_lookup: Contains the matched vulnerabilities data.
Example query:
| inputlookup mandiant_vuln_matched_lookupThe data in a lookup can be checked by running following SPL query in Splunk search:
| inputlookup <NAME OF LOOKUP>
Search
To see ingested data, select the Search tab**.**
- For Mandiant Threat Intelligence, search ``mandiant_indicator_indices
sourcetype="mandiant:advantage:indicators". - For Security Validation, search ``mandiant_validation_indices
sourcetype="mandiant:advantage:reporting_data". - For DTM, search ``mandiant_validation_indices
sourcetype="mandiant:advantage:dtm:alerts". - For MA-ASM Issues, search ``mandiant_asm_issues_indices
sourcetype="mandiant:advantage:asm:issues". - For MA-ASM Entities, search ``mandiant_asm_entities_indices
sourcetype="mandiant:advantage:asm:entities".
Indicator matching
This guide provides instructions on how to match security telemetry available in Splunk to Mandiant indicators in order to detect and respond to threats in your environment and understand if and how your organization is being attacked.
Prerequisites
- Splunk Enterprise is deployed on premises
- The Mandiant Threat Intelligence app is installed
- A modular input to ingest indicators is configured and running
- Indicator lookup is being populated
Create a Splunk KV Store to record indicator matches
-
Create a file named
collections.confwith the following content:[mandiant_indicator_hits] field._time = time field.value = string field.threat_score = string field.severity_level = string field.index = string field.sourcetype = stringIf you want to capture more fields, you can add them to this file.
-
Copy the file to your Splunk server under the
$SPLUNK_HOME/etc/apps/TA-mandiant-threat-intelligence/default/directory. -
Create a file named
transforms.confwith the following content:[mandiant_indicator_hits] collection = mandiant_indicator_hits external_type = kvstore fields_list = _time, value, threat_score, severity_level, confidence, index, sourcetypeIf you added additional fields to
collections.conf, you also need to add them to thefields_listkey in thetransforms.conffile. -
Copy the file to your Splunk server to the
$SPLUNK_HOME/etc/apps/TA-mandiant-threat-intelligence/default/directory. -
Restart Splunk to apply the changes.
Curate your search
-
Define the security telemetry and field you want to look for indicator matches on.
The following example searches the Network Traffic CIM Data Model and attempts to match values in the
dest_ipfield with values frommandiant_indicator_lookup:| datamodel Network_Traffic All_Traffic search strict_fields=false | rename All_Traffic.action as action, All_Traffic.src_ip, as src_ip, All_Traffic.user, as user, All_Traffic.dest as dest, All_Traffic.dest_ip as dest_ip, All_Traffic.src as src, All_Traffic.domain as domain | lookup mandiant_indicator_lookup value AS dst_ip OUTPUTNEW value, threat_score, severity_level | where isnotnull(threat_score) | table _time, action, value, threat_score, severity_level, index, sourcetype | outputlookup mandiant_indicator_hits append=trueThe
| outputlookup mandiant_indicator_hits append=truepart of the query writes the results of the query to the new KV Store created in the previous steps.Theappend=trueparameter is important to ensure that previously written data is not overwritten.This technique can be applied to any Splunk query by appending the lookup command. For example:
< YOUR SPLUNK QUERY>
| lookup mandiant_indicator_lookup value AS <FIELD FROM QUERY YOU WANT TO MATCH ON>
OUTPUTNEW value, threat_score, severity_level, < YOU CAN ADD OTHER FIELDS FROM THE
LOOKUP TABLE HERE IF YOU WOULD LIKE>
| where isnotnull(threat_score)
Adding
| where isnotnull(threat_score)to the query filters the results to only events that have been matched to the lookup.
Explore the results
-
To view the results of any matched events, use this Splunk query:
| inputlookup mandiant_indicator_hits -
Enrich the hits with the latest indicator context using this query:
| inputlookup mandiant_indicator_hits | lookup mandiant_indicator_lookup value as value OUTPUTNEW threat_score as current_threat_score, category, malware, campaigns, severity_level, severity_reason, last_seen, first_seen, type, threat_actor, reports -
Understand which actors are targeting your environment with this query:
| inputlookup mandiant_indicator_hits | lookup mandiant_indicator_lookup value as value OUTPUTNEW threat_score as current_threat_score, category, malware, campaigns, severity_level, severity_reason, last_seen, first_seen, type, threat_actor, reports | stats count by threat_actorReplace| stats count by threat_actorwith any other command or field you want to aggregate your results with. -
To clear the mandiant_indicator_hits KV Store, use this Splunk query:
| outputlookup mandiant_indicator_hits
Open Source Components and Licenses
Some of the components included in the Mandiant Advantage App For Splunk are licensed using free or open source licenses. We would like to thank the contributors to the following project:
- dateutil version 2.8.2:
<https://pypi.org/project/python-dateutil>(LICENSE<https://github.com/dateutil/dateutil/blob/master/LICENSE>)
Uninstall and Cleanup
- Remove
$SPLUNK_HOME/etc/apps/TA-mandiant-advantage. - Remove
$SPLUNK_HOME/var/log/Splunk/ta_mandiant__.log*_. - To reflect the cleanup changes in web console, restart the Splunk Enterprise instance.
Troubleshooting
Data is not displaying in the Threat Intelligence Overview dashboard
-
Validate Mandiant Advantage Account Configuration.
- Click Setup > Configuration and select the Mandiant Advantage Configuration tab.
- Verify that an account of type Mandiant Advantage has been added.
-
Validate Mandiant Threat Intelligence Input Configuration.
- Click Setup > Inputs.
- Verify that a Mandiant Threat Intelligence input has been added.
-
Check logs for more information.
-
For Splunk on-premises customers:
-
Open a terminal on your Splunk server.
-
Search the log file for errors using this command:
cat $SPLUNK_HOME/var/log/splunk/ta_mandiant_advantage_mandiant_advantage_indicators.log | grep -A 10 ERRORIf the ERROR log does not help you resolve the issue, contact Support (https://www.virustotal.com/gui/contact-us/support) and provide the complete contents of the
ta_mandiant_advantage_mandiant_advantage_indicators.loglog file.
-
-
For Splunk Cloud customers:
- Check logs using Splunk search since Cloud users do not have access to the terminal of the Splunk instance. Use this query:
index=_internal source=*ta_mandiant_advantage_mandiant_advantage_indicators.log index=_internal source=*ta_mandiant_advantage_mandiant_advantage_indicators.log.
- Check logs using Splunk search since Cloud users do not have access to the terminal of the Splunk instance. Use this query:
-
Not seeing any data in the Threat Intelligence | Matched Events dashboard
-
Validate the Splunk CIM app is installed.
- Click Settings > Data Models.
- Verify that there are data models listed with app value
Splunk_SA_CIM.
-
Validate data is displaying in Threat Intelligence Overview dashboard.
-
For Splunk on-premises customers:
-
Open a terminal on your Splunk server.
-
Search the log file for errors using this command:
cat $SPLUNK_HOME/var/log/splunk/ta_mandiant_advantage_mandiant_advantage_indicators.log | grep -A 10 ERROR.If the ERROR log does not help you resolve the issue, contact Support (https://www.virustotal.com/gui/contact-us/support) and provide the complete contents of the
ta_mandiant_advantage_mandiant_advantage_indicators.loglog file.
-
-
For Splunk Cloud customers:
-
Check logs using Splunk search since Cloud users do not have access to the terminal of the Splunk instance. Use this query:
index=_internal source=*ta_mandiant_advantage_mandiant_advantage_indicators.log index=_internal source=*ta_mandiant_advantage_mandiant_advantage_indicators.log.
-
-
-
Validate that Event Matching is enabled.
- Click Setup > Configuration and select the Indicator**|** Event Matching tab.
- Verify that the Enable Event Matching setting is checked.
- Verify that at least one data model is selected in the Data Models To Match setting.
-
Validate that Splunk Saved Searches are enabled.
- Click Settings > Searches, reports, and alerts.
- Filter the page on App:
Mandiant Advantage App for Splunkand Owner:nobody. - Verify that the Saved Searches selected in the Data Models To Match app setting are enabled.
-
Validate that data model queries return results.
- Click Settings > Searches, reports, and alerts.
- Filter the page on App:
Mandiant Advantage App for Splunkand Owner:nobody. - For one of the enabled saved searches, click Run.
- Verify that the search returns results.
- If the search does not return results, trying expanding the time range used for the search.
- If the search still does not return results, verify that there are data sources writing to the Splunk instance that are compatible with the data model you're troubleshooting.
-
Check logs for more information.
-
For Splunk on-premises customers:
-
Open a terminal on your Splunk server.
-
Search the log file for errors using this command:
cat $SPLUNK_HOME/var/log/splunk/ta_mandiant_advantage_command_mandiant_match_events.log | grep -A 10 ERROR.If the ERROR log does not help you resolve the issue, contact Support (https://www.virustotal.com/gui/contact-us/support) and provide the complete contents of the
ta_mandiant_advantage_command_mandiant_match_events.loglog file.
-
-
For Splunk Cloud customers:
-
Check logs using Splunk search since Cloud users do not have access to the terminal of the Splunk instance. Use this query:
index=_internal source=*ta_mandiant_advantage_command_mandiant_match_events.log..
-
-
Data is not displaying in the Security Validation dashboards
-
Validate Mandiant Validation Account Configuration.
- Click Setup > Configuration and select the Mandiant Advantage Configuration tab.
- Verify that an account of type Mandiant Validation has been added.
-
Validate Mandiant Security Validation Input Configuration.
- Click Setup > Inputs.
- Verify that a Mandiant Security Validation input has been added.
-
Validate Validation Job Indices.
- Click Setup > Configuration and select the Mandiant Advantage Configuration tab.
- Verify that the correct index/indices have been entered in the Validation Jobs Indices setting.
-
Check logs for more information.
-
For Splunk on-premises customers:
-
Open a terminal on your Splunk server.
-
Search the log file for errors using this command:
cat $SPLUNK_HOME/var/log/splunk/ta_mandiant_advantage_mandiant_security_validation_reporting.log | grep -A 10 ERROR.If the ERROR log does not help you resolve the issue, contact Support (https://www.virustotal.com/gui/contact-us/support) and provide the complete contents of the
ta_mandiant_advantage_mandiant_security_validation_reporting.loglog file.
-
-
For Splunk Cloud customers:
-
Check logs using Splunk search since Cloud users do not have access to the terminal of the Splunk instance. Use this query:
index=_internal source=*ta_mandiant_advantage_mandiant_security_validation_reporting.log.
-
-
Data is not displaying in the MA-ASM | MA-ASM Issues dashboard
-
Validate Mandiant MA-ASM Account Configuration.
- Click Setup > Configuration and select the Mandiant Advantage Configuration tab.
- Verify that an account of type MA-ASM has been added.
-
Validate Mandiant MA-ASM Issues Input Configuration.
- Click Setup > Inputs.
- Verify that an MA-ASM Issues input has been added.
-
Validate MA-ASM Issues Indices.
- Click Setup > Configuration and select the Dashboard Settings tab.
- Verify that the correct index/indices have been entered in the MA-ASM Issues Indices setting.
-
Check logs for more information.
-
For Splunk on-premises customers:
-
Open a terminal on your Splunk server.
-
Search the log file for errors using this command:
cat $SPLUNK_HOME/var/log/splunk/ta_mandiant_advantage_TA_mandiant_advantage_rh_mandiant_advantage_asm_issues.log | grep -A 10 ERROR.If the ERROR log does not help you resolve the issue, contact Support (https://www.virustotal.com/gui/contact-us/support) and provide the complete contents of the
ta_mandiant_advantage_TA_mandiant_advantage_rh_mandiant_advantage_asm_issues.loglog file.
-
-
For Splunk Cloud customers:
-
Check logs using Splunk search since Cloud users do not have access to the terminal of the Splunk instance. Use this query:
index=_internal source=*ta_mandiant_advantage_TA_mandiant_advantage_rh_mandiant_advantage_asm_issues.log.
-
-
Data is not displaying in the MA-ASM | MA-ASM Entities dashboard
-
Validate Mandiant MA-ASM Account Configuration.
- Click Setup > Configuration and select the Mandiant Advantage Configuration tab.
- Verify that an account of type MA-ASM has been added.
-
Validate Mandiant MA-ASM Entities Input Configuration.
- Click Setup > Inputs.
- Verify that an MA-ASM Entities input has been added.
-
Validate MA-ASM Entities Indices.
- Click Setup > Configuration and select the Dashboard Settings tab.
- Verify that the correct index/indices have been entered in the MA-ASM Entities Indices setting.
-
Check logs for more information.
-
For Splunk on-premises customers:
- Open a terminal on your Splunk server.
- Search the log file for errors using this command:
cat $SPLUNK_HOME/var/log/splunk/ta_mandiant_advantage_TA_mandiant_advantage_rh_mandiant_advantage_asm_entities.log | grep -A 10 ERROR. - If the ERROR log does not help you resolve the issue, contact Support (https://www.virustotal.com/gui/contact-us/support) and provide the complete contents of the
ta_mandiant_advantage_TA_mandiant_advantage_rh_mandiant_advantage_asm_entities.loglog file.
-
For Splunk Cloud customers:
-
Check logs using Splunk search since Cloud users do not have access to the terminal of the Splunk instance. Use this query:
index=_internal source=*ta_mandiant_advantage_TA_mandiant_advantage_rh_mandiant_advantage_asm_entities.log.
-
-
Data is not displaying in the DTM Alerts dashboard
-
Validate Mandiant Advantage Account Configuration.
- Click Setup > Configuration and select the Mandiant Advantage Configuration tab.
- Verify that an account of type Mandiant Advantage has been added.
-
Validate Mandiant DTM Alerts Input Configuration.
- Click Setup > Inputs.
- Verify that a Mandiant DTM Alerts input has been added.
-
Validate DTM Alerts Indices.
- Click Setup > Configuration and select the Dashboard Settings tab.
- Verify that the correct index/indices have been entered in the DTM Alerts Indices setting.
-
Check logs for more information.
-
For Splunk on-premises customers:
-
Open a terminal on your Splunk server.
-
Search the log file for errors using this command:
cat $SPLUNK_HOME/var/log/splunk/ta_mandiant_advantage_mandiant_advantage_monitoring_alerts.log | grep -A 10 ERROR.If the ERROR log does not help you resolve the issue, contact Support (https://www.virustotal.com/gui/contact-us/support) and provide the complete contents of the
ta_mandiant_advantage_mandiant_advantage_monitoring_alerts.loglog file.
-
-
For Splunk Cloud customers:
-
Check logs using Splunk search since Cloud users do not have access to the terminal of the Splunk instance. Use this query:
index=_internal source=*ta_mandiant_advantage_mandiant_advantage_monitoring_alerts.log.
-
-
Release Notes
-
Version 1.6
- New Features
- Added a new setting to optionally include or exclude open source indicators from data ingestion.
- Added support for indicator data collection in distributed Splunk environments where the search head does not have access to the internet.
- Added new saved search mandiant_master_lookup to populate the mandiant_master_lookup kv store.
- Added new Matched Events Summary dashboard.
- Added support for the Indicator Threat Score, Severity Level, and Severity Reason as returned by the Mandiant API.
This feature is in Public Preview. For more information, contact your TSC, your CSM, or contact Support (https://www.virustotal.com/gui/contact-us/support).
- Improvements
- Removed validator on MA-ASM Entities Modular Input settings to allow for a query to actually be set.
- Improved error handling and logging in MA-ASM Entity Modular Input.
- Improved logging and error handling in mandiantmatchedvulns custom command.
- Added a new Vuln Host Field setting to the Vulnerability Correlation feature. This allows for an event field to be used as the host impacted by the CVE.
- Updated the Mandiant Threat Intel Client to version 0.1.18
- Fixes
- Fixed an issue where the matched events dashboard would not show results in the table view when the matched events were not attributed to a Threat Actor or Malware Family.
- The MA-ASM Issues Modular Input now ingests events where the
issue statuschanged between syncs but thelast seen afterdate did not.
- New Features
-
Version 1.5.1
- Updated Mandiant Intel Client to v0.1.12 to reduce API calls made when collecting indicators and improve modular input performance
-
Version 1.5.0
-
New Features
-
New Mandiant Indicator | Event Matching feature deployed with support to tune Notable Alert creation.
The Threat Intelligence Correlation feature is now deprecated.
-
Additional context provided for Notable Alerts created by the app.
-
New Threat Intelligence Overview dashboard provides more context about the data set.
-
New Mandiant Matched Events dashboard provides more context to potential threats in the environment.
-
-
Improvements
- Added support for associated campaigns and Threat Intelligence reports for ingested indicators.
- Reduced dependency on Saved Searches to improve overall system performance.
-
Fixes
- Fixed an issue where the MA-ASM Input Config only displays collections from 1 project/organization.
- Fixed an issue where Threat Intelligence Indicator data collection would fail if the system clock was ahead of internet time.
-
-
Version: 1.4.3
- Fixed an issue in the MA-ASM Modular Inputs where the second page of results would not be collected.
-
Version 1.4.2
- Fixed an issue where Projects and Collections could not be selected for MA-ASM Inputs when using a Proxy Server without a valid SSL certificate.
- Fixed an issue where the checkpoint date could not be parsed in MA-ASM Inputs.
- Fixed an issue where the results would not display on the MA-ASM Entities Dashboard.
-
Version 1.4.1
- Fixed an issue where Jobs with Integration events and Host events were not being ingested.
- Fixed typos and naming consistency issues on MA-ASM Dashboards.
-
Version 1.4.0
- Added data collection for Mandiant MA-ASM entities and issues.
- Added MA-ASM dashboard.
-
Version: 1.3.1
- Added data collection for Mandiant Data Threat Monitoring Alerts.
- Added DTM Alert dashboard.
-
Version: 1.2.0
- Added proxy configuration in account configuration page so that user can configure individual proxy for each account.
- Added indices field in the correlation details dashboards and updated drill down to filter on clicked index.
-
Version: 1.1.0
- Added field-based vulnerability correlation feature to find sightings in Splunk events.
- Added Vulnerability Overview and Vulnerability Details Dashboards.
- Added feature to update old indicators and sightings.
- Added feature to retire old vulnerabilities and sightings.
-
Version: 1.0.0
- Added data collection for Mandiant Threat Intelligence and Security Validation.
- Added field-based correlation feature to find sightings in CIM-compliant Splunk events.
- Added Mandiant Overview, Threat Intelligence Overview, Correlation Overview, Correlation Details, Security Validation Overview and Security Validation Details Dashboards.
- Added feature to create Notable Events for newly found sightings.
- Added feature to retire old indicators and sightings.
Upgrade Instructions
Upgrade from v1.0.0
- After upgrading the add-on, you'll need to update the account in Threat Intelligence Correlation settings and Vulnerability Correlation settings:
- Click Setup > Configuration > Threat Intelligence Correlation Settings.
- Select an account under the Mandiant Advantage Account field.
- Click Save.
- Perform the same steps for Vulnerability Correlation settings if necessary.
Upgrade from v1.1.0
- If you've already configured a proxy in the old version, then after upgrading the app you'll need to re-configure the proxy by editing individual accounts:
- Click Setup > Configuration > Edit Account.
- Check Enable Proxy.
- Fill in all the proxy details available.
- Finally, click Add or Update to save the account.
- Follow this for all the accounts where a proxy should be used for making the connection.
Upgrade from v1.2.0, v1.3.1
- No additional steps required.
Updated 5 months ago
