ASM Google Cloud Integration
Special privileges requiredThis feature is only available to ASM administrators.
See how credentials for integrations are stored here
This document outlines the Google Cloud integration process with Attack Surface Management (ASM). Using this integration, you gain visibility of your Google Cloud assets and extended ecosystem for faster identification of new or unmanaged assets and remediation of vulnerabilities, misconfigurations, and exposures.
For customers with IT infrastructure across multiple clouds, Google Threat Intelligence recommends using the inbound integrations with AWS, Azure, and Google Cloud for a consolidated view of cloud and internet-facing assets.
The ASM Google Cloud integration leverages Google Cloud's service account impersonation. By creating a service account and delegating your account access, you'll be able to assume control of the service account and fetch the respective resources. This prevents both parties from being required to retain their credentials.
- ASM implements a form of confused-deputy mitigation, which works by preventing the creation of the integration if an integration associated with the same service account already exists.* If your Google Cloud organization is configured with an organization policy that restricts identities by domain, such as
iam.allowedPolicyMemberDomains, you need to allow ASM’s Google Workspace Customer ID in the policy. This Customer ID is C0439tmya. For instructions on how to allow a specific Customer ID, see Setting the organization policy.
See Google Cloud Related Entities in ASM to learn more about the Entities created in ASM using this integration.
Create a Service Account
Follow either Method A or Method B to create a Google Cloud service account.
- Method A: Create a Service Account through Google Cloud Console
- Method B: Create a Service Account through gcloud CLI
Once a service account has been created, proceed to the instructions to Create Google Cloud Integration within ASM.
Method A: Create a Service Account through Google Cloud Console
Execute the following steps in the Google Cloud's web console:
-
Once successfully authenticated with Google Cloud console through a user who has the appropriate permissions to create a service account and a role, browse to https://console.cloud.google.com/iam-admin/roles. Ensure the current project is the one you would like for the integration to access. If you are not in the correct project, navigate to the desired project.

-
Create a Role using the following process:
-
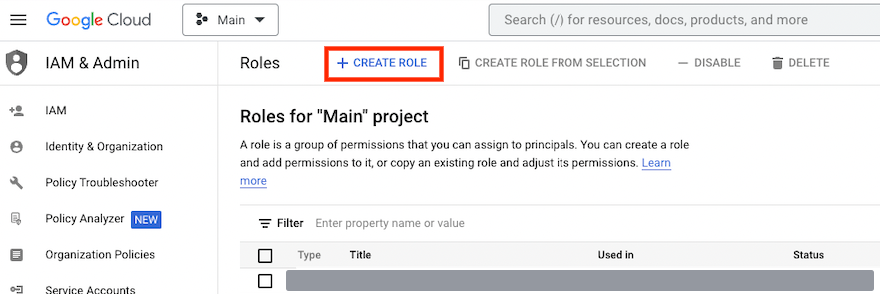
Click +Create role .
-
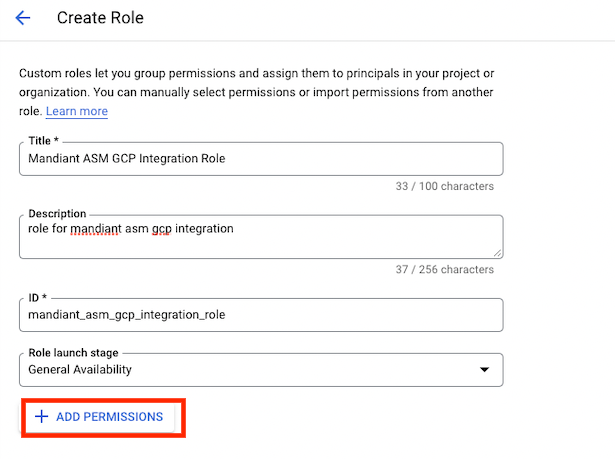
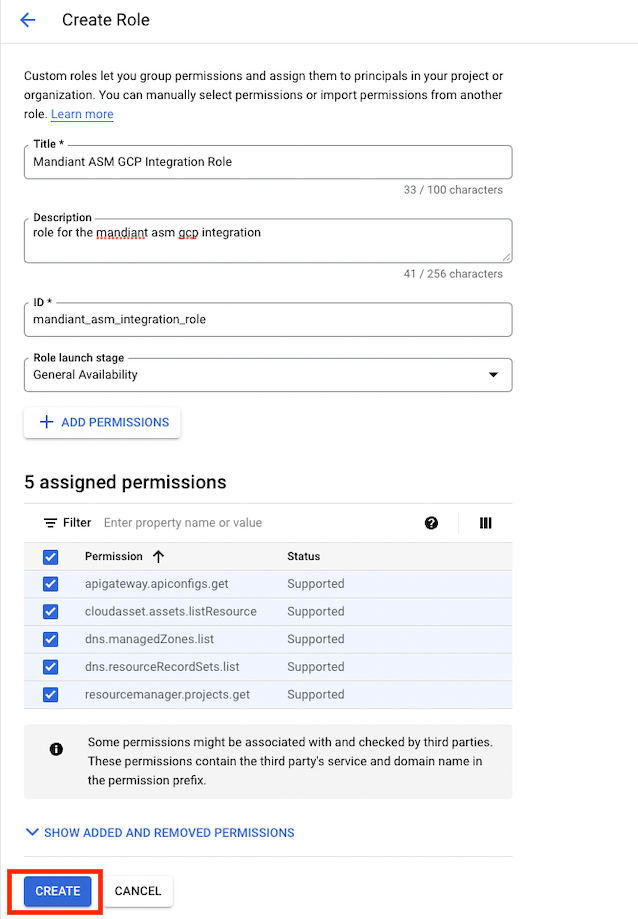
In the Create Role interface, fill in the following fields and click +Add permissions .
- Title: Friendly title for the role, for example, ASM GCP Integration Role
- Description: Short description describing what the role does
- ID: ID for the role, for example, asm_gcp_integration-role
- Role launch stage: General Availability
-
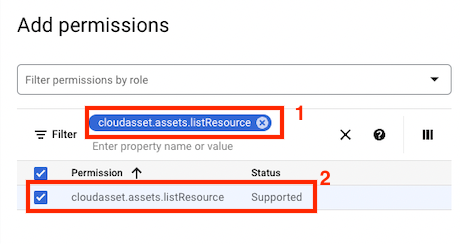
In the Add permissions sub-menu, add the following permissions:
-
cloudasset.assets.listResource -
dns.managedZones.list -
dns.resourceRecordSets.list -
apigateway.apiconfigs.get -
resourcemanager.projects.get- The easiest way to do this is to copy the permission name, for example,
cloudasset.assets.listResourceand paste it into the Enter property name or value section and then click enter. When the role appears, click the checkbox next to it. Repeat this process for each permission.* After clicking the checkbox, clear the filter before searching for the next permission, or else the new permission won't show up.
- The easiest way to do this is to copy the permission name, for example,
-
-
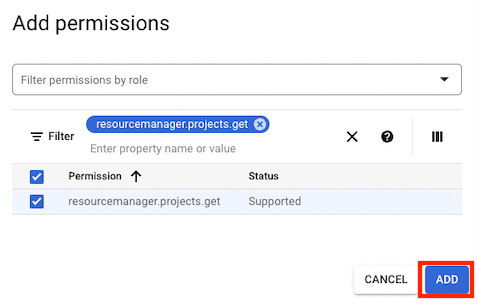
After all the permissions have been added, click Add.
-
Confirm the Create Role interface shows that all five permissions have been assigned and click Create.
-
-
Create a service account using the following process:
-
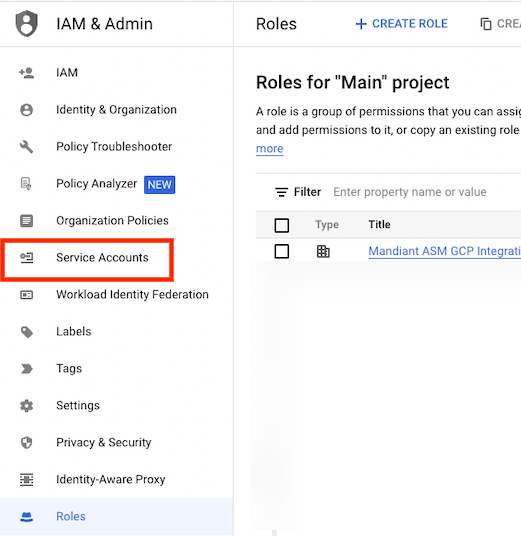
From the IAM & Admin menu, click the Service Accounts tab.
-
Click + Create service account.

-
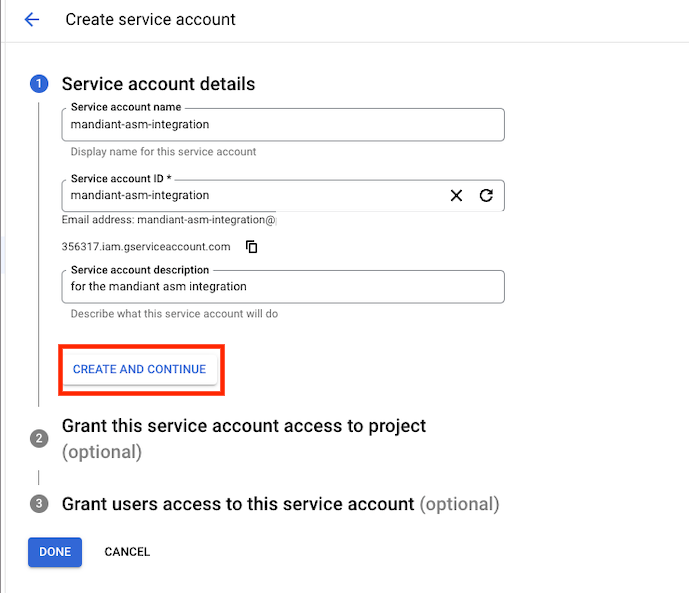
In the Create service account interface, fill in the following fields for the Service account details section and click Create and continue.
- Service account name: Friendly name for the service account.
- Service account ID: This is automatically populated based on the first field.
- Service account description: Quick note providing a description of what this service account does.
-
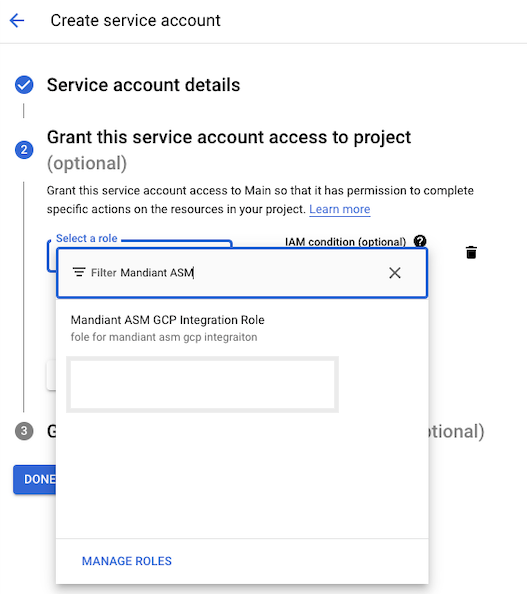
For the Grant this service account access to project section, click Select a role and, in the filter, type the name of the role created earlier in this section, for example, ASM GCP Integration Role.
-
Select the role and click Continue.
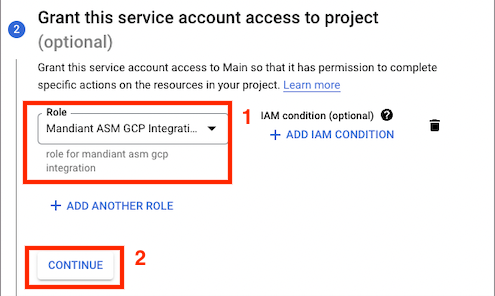
-
Under the Grant users access to this service account section, for the Service account users role field, enter the Mandiant Google Cloud service account email and click Done.
The Mandiant Google Cloud service account email is
gcp-inbound-integration@asm-mcp-prod-01-f8ec.iam.gserviceaccount.com.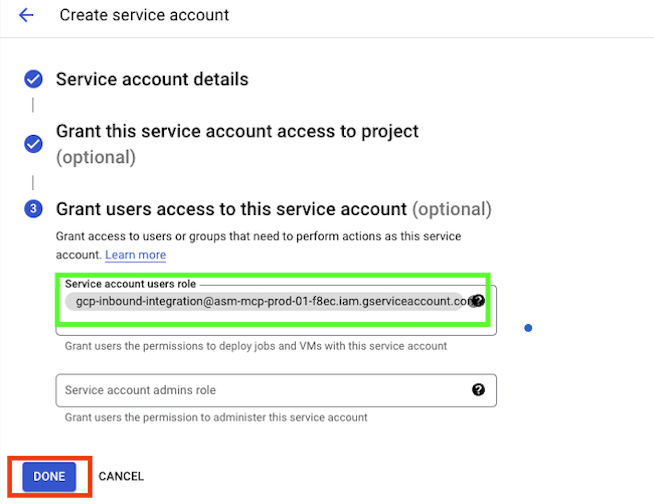
-
Once the Service Account is created, navigate to the Service accounts page (you are automatically redirected after clicking Done in the previous step), and click the email link belonging to the service account you just created.
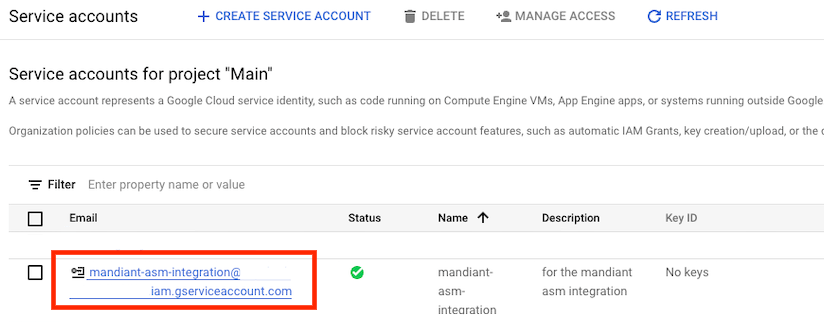
Make a note of the email belonging to your service account (not the
gcp-inbound-integration@service account) as you'll need it in the next section, Create Google Cloud Integration within ASM. -
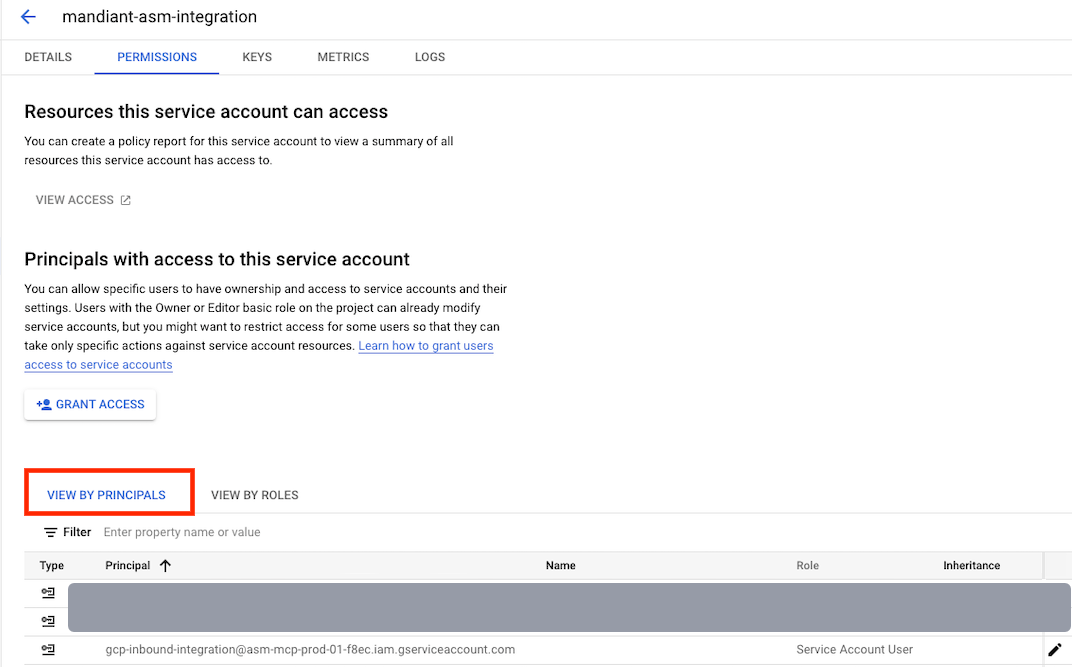
Click the Permissions tab in the navigation bar. A list of Principals appears.
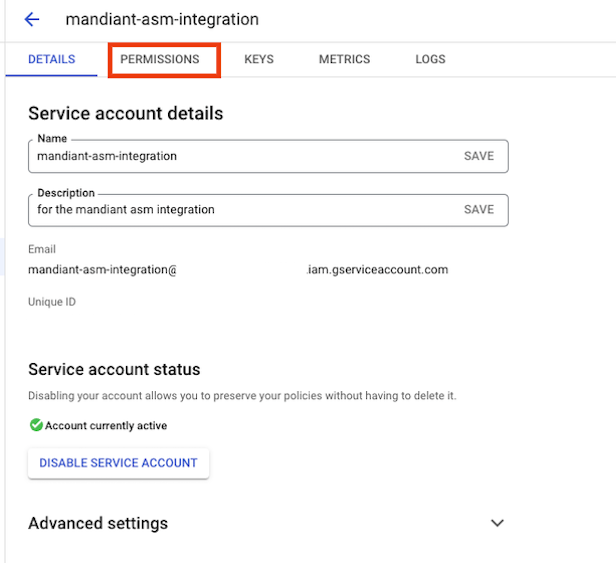
-
Ensure that the View by principals tab is selected and that the Mandiant Google Cloud service account email is listed.
-
Click the pencil icon associated with this Principal.

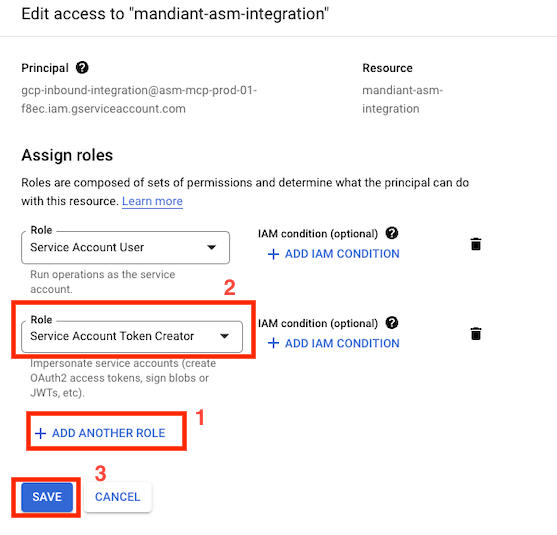
- Under the Assign roles section, click + Add another role and choose Service Account Token Creator from the drop-down menu. Click Save.
-
-
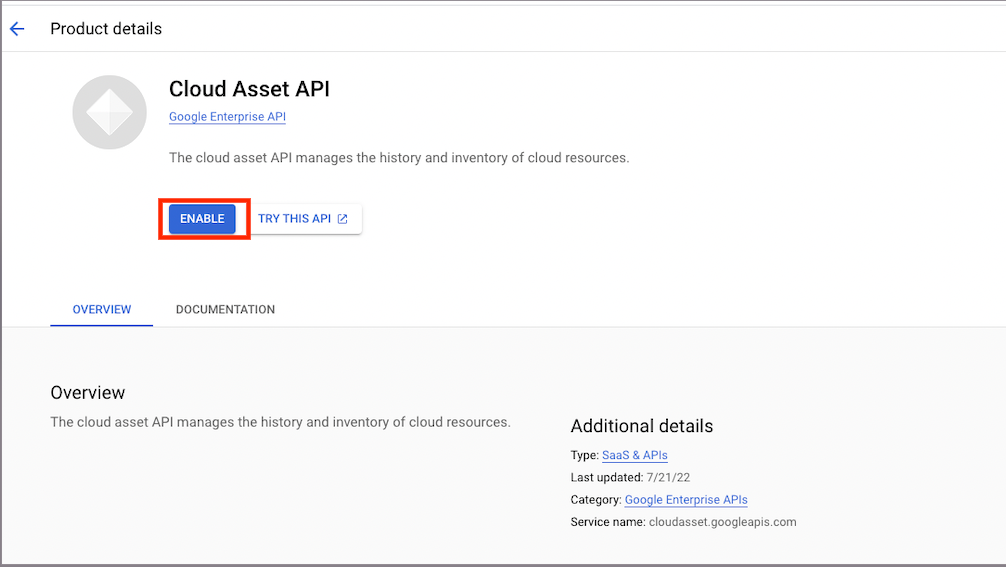
Lastly, enable the APIs for the following services by clicking each of the respective service hyperlinks and clicking Enable.
-
Cloud Asset API: This allows the integration to fetch resources through Cloud Asset inventory.
-
Cloud Resource Manager API: This allows the integration to fetch the list of projects.
-
Cloud DNS API: This allows you to translate domain name requests into IP addresses.
-
API Gateway API: This allows the integration to secure and manage REST APIs.
-
Method B: Create a Service Account through gcloud CLI
-
Make sure you are authenticated with Google Cloud through the gcloud CLI by running:
gcloud auth listThe following output should be returned:
Credentialed Accounts ACTIVE ACCOUNT * [email protected] To set the active account, run: $ gcloud config set account 'ACCOUNT' -
Set the project for which you would like the integration to fetch resources by running:
gcloud config set project <var>PROJECT_ID</var>PROJECT_IDis a variable. Be sure to use the Project ID and not the Project name.Successful output looks like the following:
Updated property [core/project].If you see the following output, it means that the project cannot be found. This is most likely because the Project Name instead of the Project ID was used.
WARNING: You do not appear to have access to project <var>[REQUESTED-PROJECT-HERE]</var> or it does not exist.
Are you sure you wish to set property [core/project] to REQUESTED<var>-PROJECT-HERE</var>?

Do you want to continue (Y/n)?
If you would like to see all the projects in your organization and their respective Project IDs, run the following command:
gcloud projects list -
Create a custom role within Google Cloud that follows the principle of least privileges.
Save the contents of the following YAML configuration:
title: masm-integration-role
description: integration role for the mandiant asm gcp integration
stage: GA
includedPermissions:
- cloudasset.assets.listResource
- dns.managedZones.list
- dns.resourceRecordSets.list
- resourcemanager.projects.get
- apigateway.apiconfigs.get
Using the gcloud CLI, run the following command:
gcloud iam roles create masm_integration_role --project <var>PROJECT_ID</var> --file=role.yamlPROJECT_IDis a variable. Be sure to use the Project ID and not the Project name. -
Create a service account.
Using the gcloud CLI, run the following command:
gcloud iam service-accounts create masm-integration-svc-account --description="Service Account for MASM GCP Integration" --display-name="MASM GCP Integration Service Account"masm-integration-svc-accountis the name of the service account created. You can use any value for this option, however, ensure to swap it in the next set of instructions.If successful, the following output should be returned:
Created service account [masm-integration-svc-account]. -
Bind the role created in Step 3 to the service account created in the previous step.
Using the gcloud CLI, run the following command:
gcloud projects add-iam-policy-binding <var>PROJECT_ID</var> --member="serviceAccount:masm-integration-svc-account@<var>PROJECT_ID</var>.iam.gserviceaccount.com" --role="projects/<var>PROJECT_ID</var>/roles/masm_integration_role"PROJECT_IDis a variable. Be sure to use the Project ID and not the Project name. There are three locations where this needs to be replaced.If successful, the following output should be returned:
Updated IAM policy for project [<var>PROJECT_ID</var>]. bindings: - members: - serviceAccount:masm-integration-svc-account@<var>PROJECT_ID</var>.iam.gserviceaccount.com role: projects/<var>PROJECT_ID</var>/roles/masm_integration ... -
Allow ASM to impersonate your service account.
Using the gcloud CLI, run the following command:
gcloud iam service-accounts add-iam-policy-binding masm-integration-svc-account@<var>PROJECT_ID</var>.iam.gserviceaccount.com --member="serviceAccount:gcp-inbound-integration@asm-mcp-prod-01-f8ec.iam.gserviceaccount.com" --role="roles/iam.serviceAccountTokenCreator"gcp-inbound-integration@asm-mcp-prod-01-f8ec.iam.gserviceaccount.comis the email of the service account belonging to ASM.If successful, the following output should be returned:
Updated IAM policy for serviceAccount [masm-integration-svc-account@<var>PROJECT_ID</var>.iam.gserviceaccount.com]. bindings: - members: - serviceAccount:gcp-inbound-integration@asm-mcp-prod-01-f8ec.iam.gserviceaccount.com role: roles/iam.serviceAccountTokenCreator ... -
Enable the
Cloud Asset API,Cloud Resource Manager API,Cloud DNS API, andAPI Gateway APIservices. Using the gcloud CLI, run the following commands:gcloud services enable cloudresourcemanager.googleapis.com gcloud services enable cloudasset.googleapis.com gcloud services enable dns.googleapis.com gcloud services enable apigateway.googleapis.comIf successful, each command should return output similar to:
Operation "operations/acat.p2-11111111111-88a9d5b4-c262-40fa-aeee-be6029ebfef3" finished successfully.If no response is returned, it is most likely because the service was already enabled.
Create Google Cloud Integration within ASM
The following steps take place within ASM's Platform. It's assumed that a Google Cloud service account was created as documented in the Create a Service Account section:
-
From the Projects and Settings menu in ASM, select the appropriate Project then click Account Settings.

-
Click Integrations.
-
From Inbound Integrations, click Add New for Google Cloud.

-
In the Email field, input the email of the Google Cloud service account, and click Connect.
After successful integration, you should see an "Integration created" message:

If you see an error message, instead of an "Integration created" success message, the issue could be in how the Google Cloud service account was created. The most common reason would be to forget to grant the Google Cloud service account the Service Account Token Creator role.
-
Connect the integration to the appropriate Collection.
-
Click Collections and click
Collection Settings for the Collection that you want to connect the integration to.

-
Select the Integrations tab.

-
Select Connect Integration and Link the integration.

The integration is immediately added to the Collection.
Clickto remove the integration from this Collection.

-
Click
to close the Connect Integration pane. Click Scan Collection to update your Collection with the current settings and integrations. Otherwise, your newly configured integration is incorporated at your regularly scheduled scan interval.

-
Google Cloud Related Entities in ASM
The Entities created from the Google Cloud inbound integration are as follows:
| Entity Name | Google Cloud Asset Name | Relevant Raw JSON Fields | Dependencies |
|---|---|---|---|
| GcpApiGateway | API Gateway |
| Only API Gateways which are in the ACTIVE state are created as Entities. |
| GcpAppEngineApplication | App Engine Application |
| There can only be one App Engine Application per project. |
| GcpCloudFunction | Cloud Function |
| Only Cloud Functions which are triggered using HTTP are created as Entities as they are deemed to be public facing. Functions configured with other triggers, such as "write to bucket," are ignored. |
| GcpCloudSQLInstance | Cloud SQL Instance |
| Only Cloud SQL Instances with public IP addresses and in the RUNNABLE state are created as Entities. |
| GcpComputeEngineInstance | Compute Engine |
| Only Compute Engine Instances with public IP addresses and in the RUNNING state are created as Entities. |
| GcpStorageBucket | Storage Bucket |
| If anonymous_access_forbidden is false, a World Readable Google Cloud Storage Bucket Issue is created during the enrichment process. |
Updated 5 months ago
